CloudMigrator Quick Start Guide
Migrating from Hosted Exchange
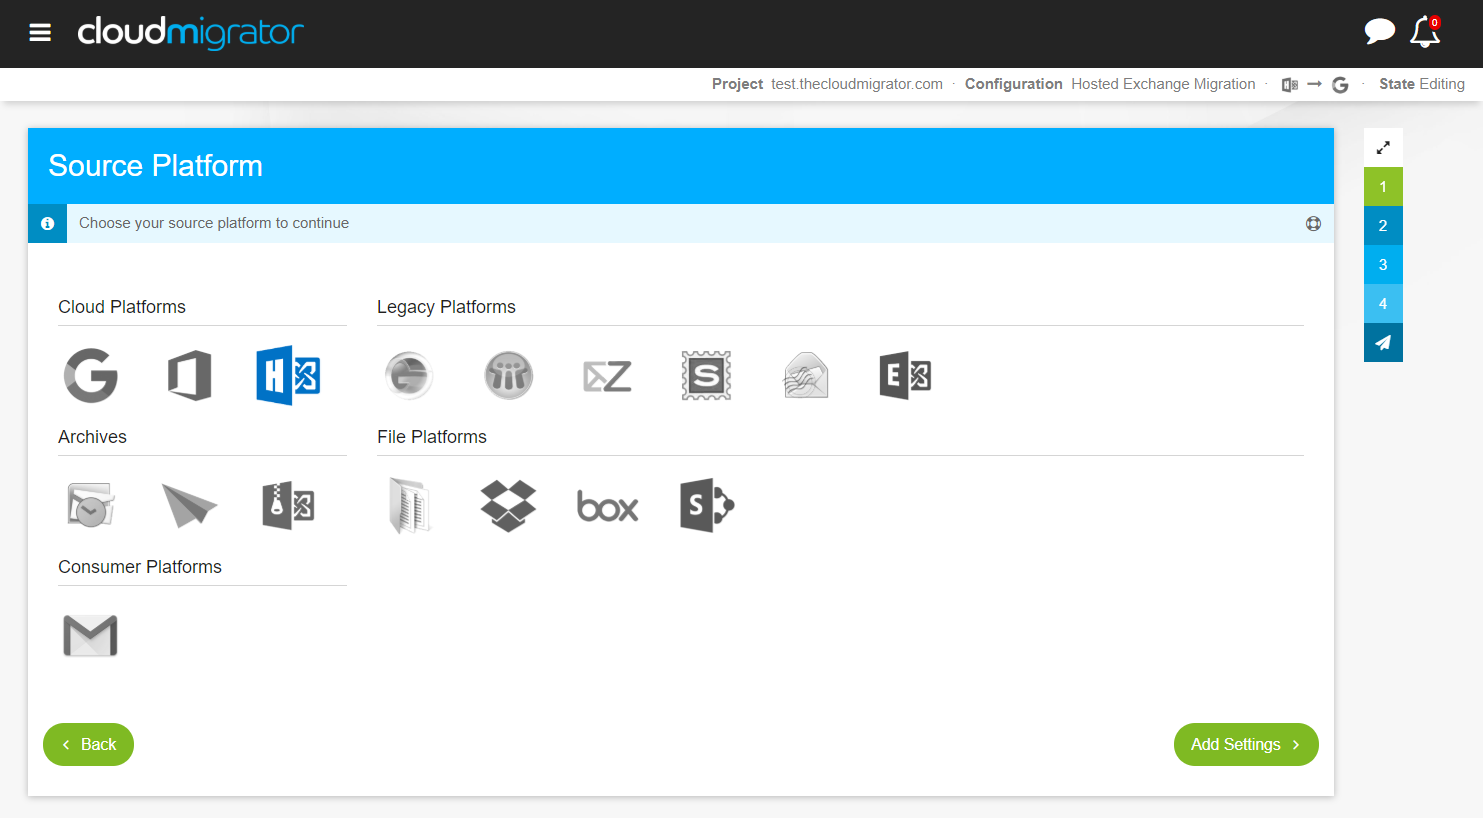
The following instructions are designed to assist you in migrating content from Hosted Exchange.
Pre-requisites
Check Provider
When migrating from Hosted Exchange CloudMigrator has preset configurations for the most popular providers, you can simply select your provider and the server and authentication details will be pre-populated. If your provider is not supported you can enter the details manually, but you will need to obtain the Autodiscover or Direct EWS URL, and authentication method supported.
Setting up Application Impersonation
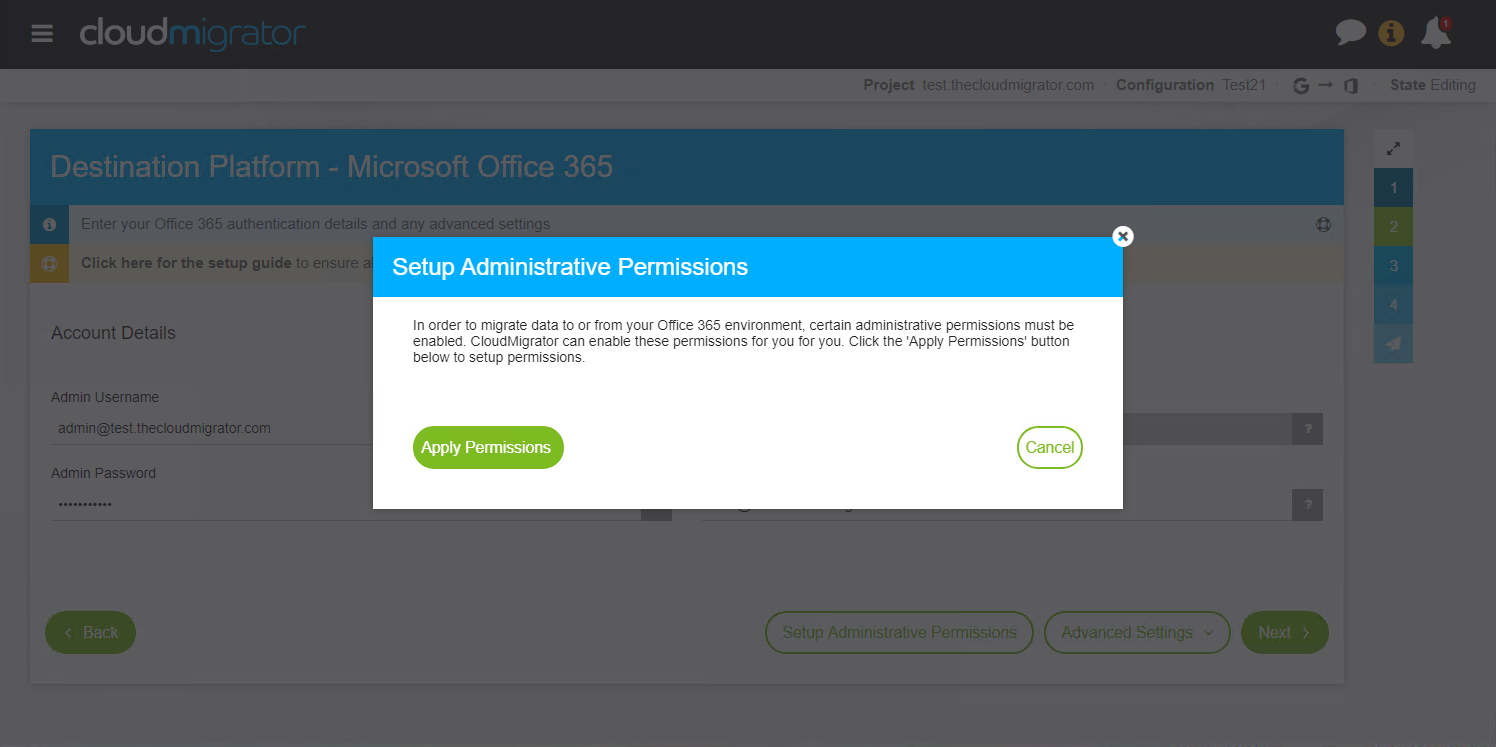
Alternative Application Impersonation Setup
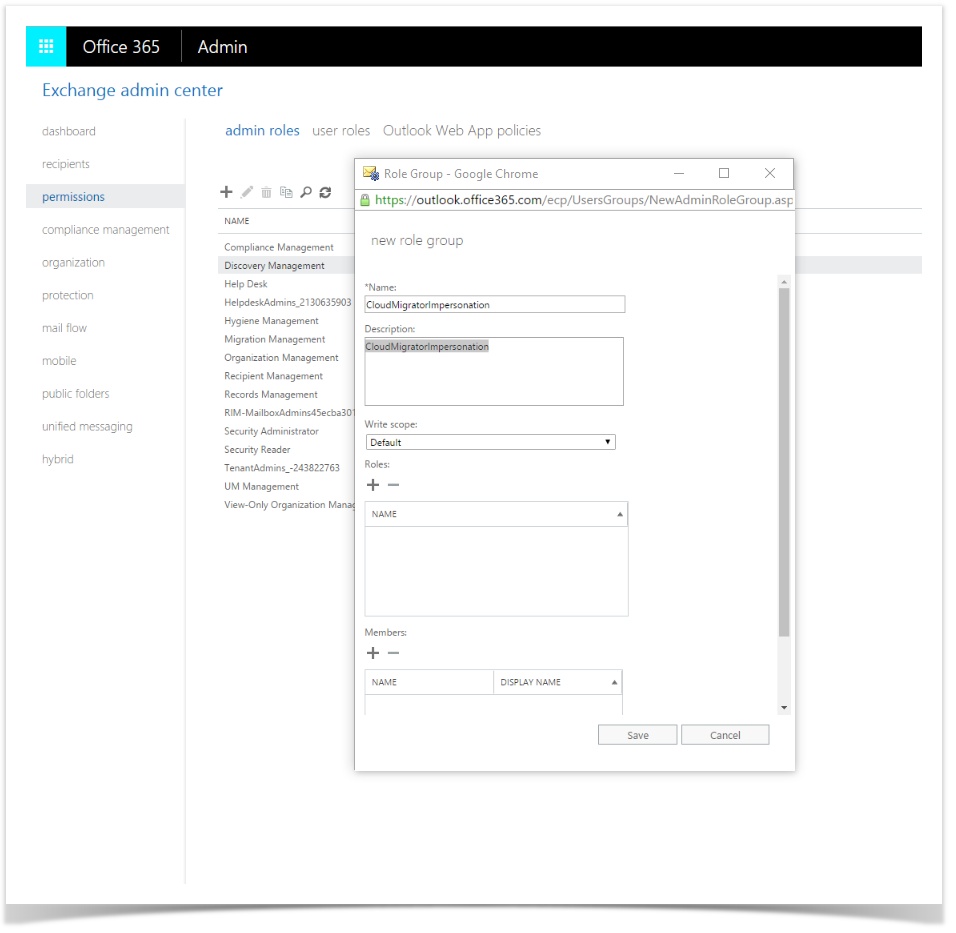
First login to the Office 365 Exchange Admin Portal. Go to 'permissions' on the left hand side bar and click the + symbol in order to add a new role group. Enter 'CloudMigratorImpersonation' in both the Name and Description fields.
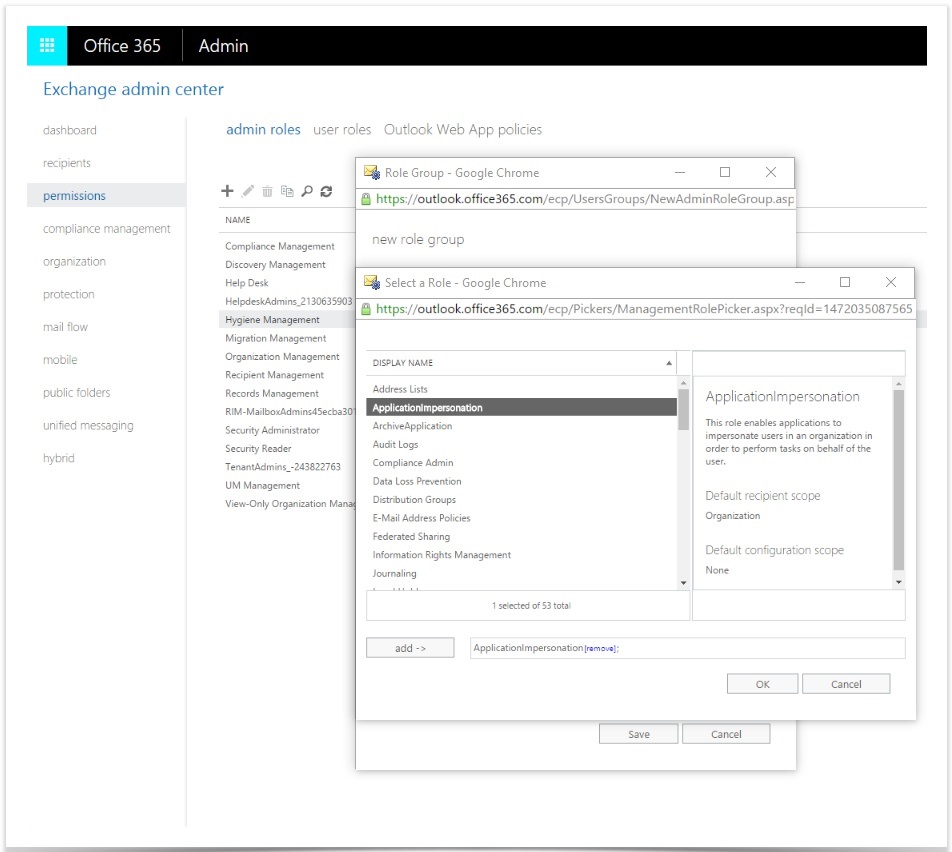
Next, click the + symbol under 'Roles', select ApplicationImpersonation, click 'add' and the click 'OK'.
Next, click the + symbol under 'Members', select your administrator user, click 'add' and then click 'OK'.
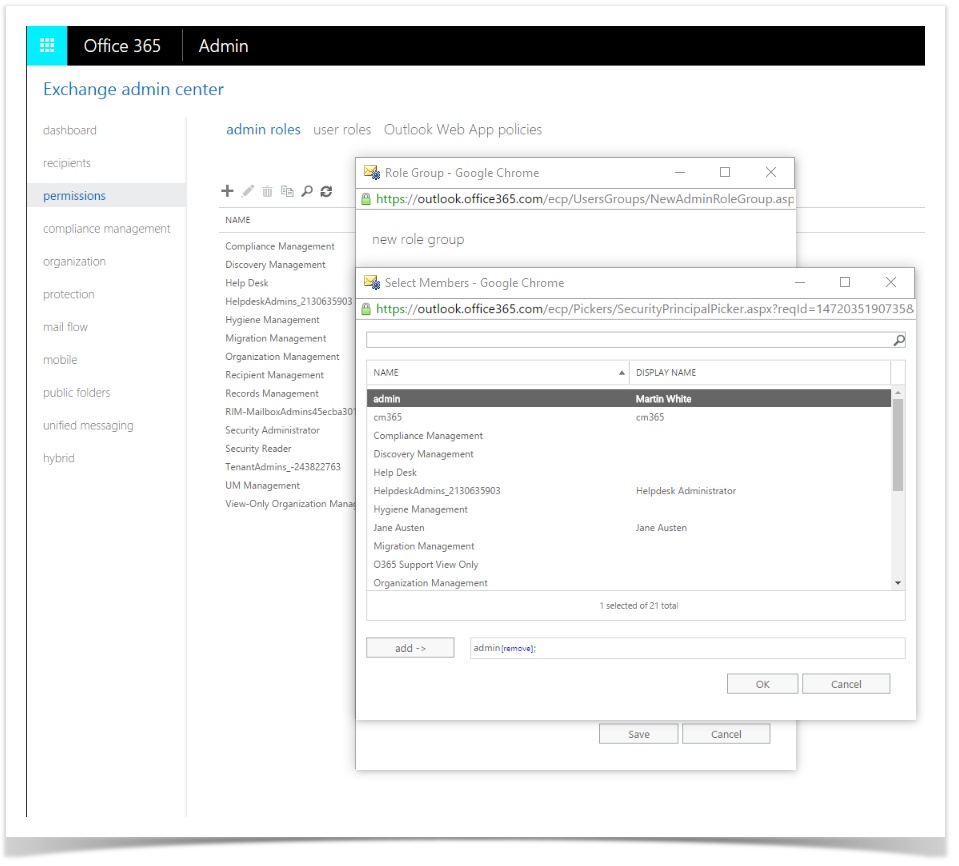
Click 'Save' and you will see the impersonation role listen in admin roles. Application impersonation is now set up.
Setting up Delegated Access
Delegated access gives a user account permission to access another. Delegated access must be set up if you are not using an Enterprise plan of Office 365
First login to the Office 365 Exchange Admin Portal. Go to 'recipients' then under 'mailboxes', double-click the user you wish to delegate access to then go to 'Mailbox Delegation' and click the '+' symbol under 'Full Access'
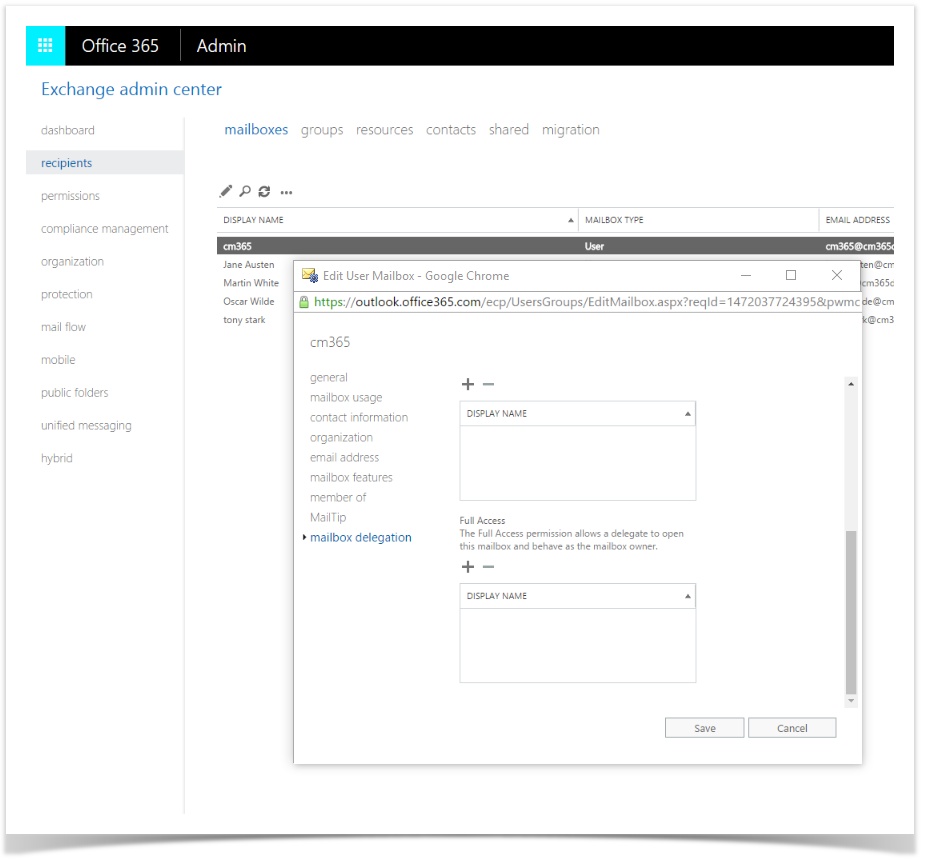
Next, select your administrator user, click 'add' and then click 'OK'
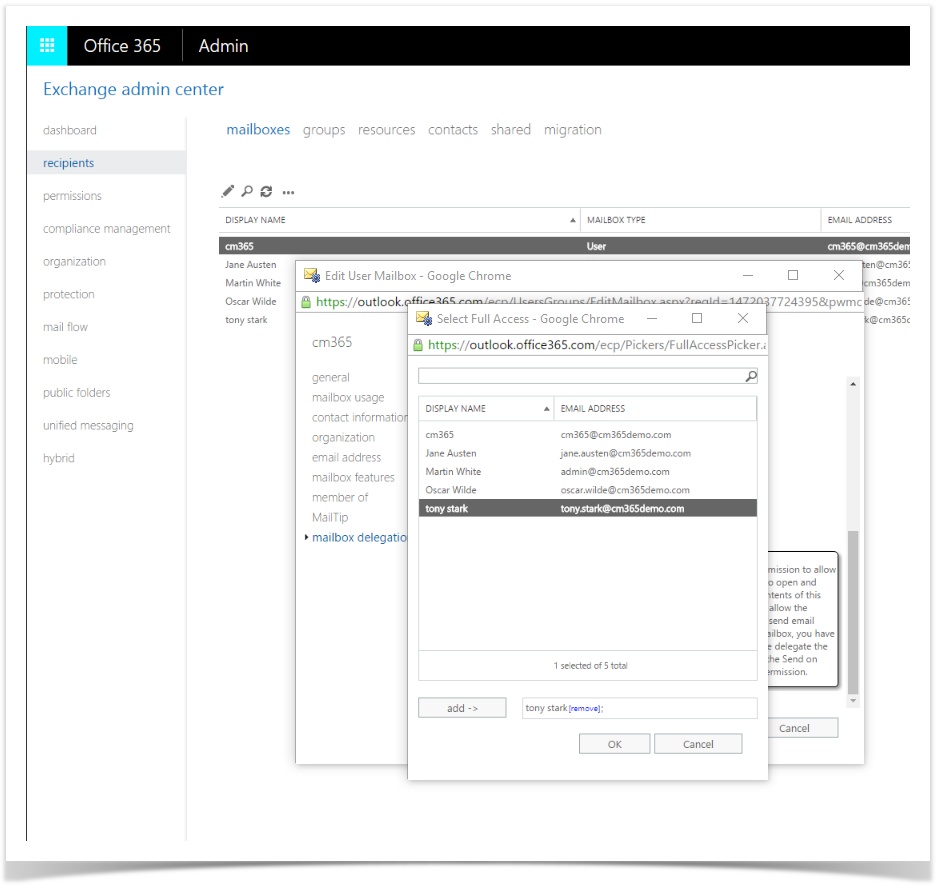
Click 'Save' and your administrator user now has the required access for the migration to occur, repeat this process for all users you wish to migrate.
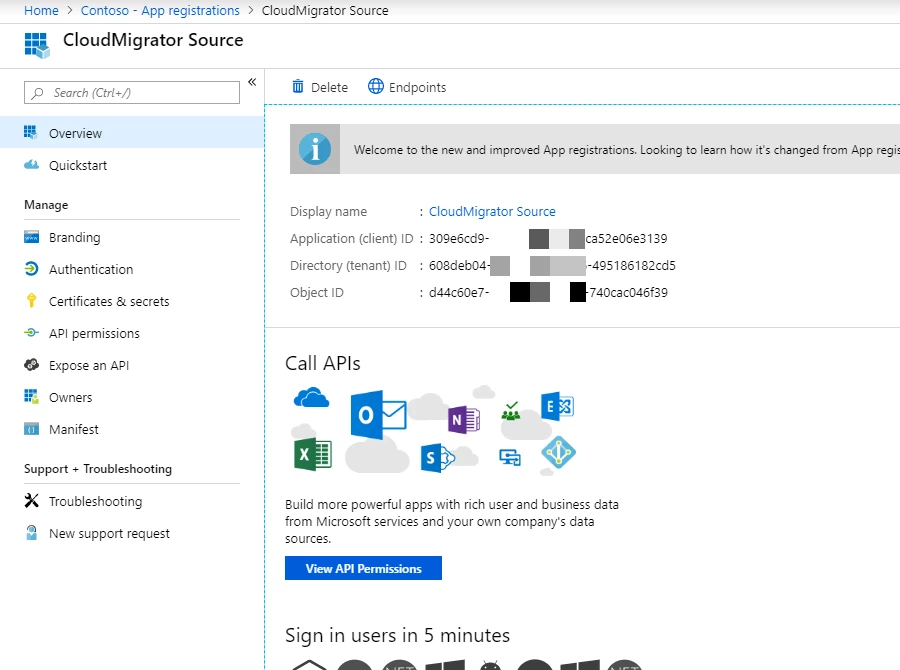
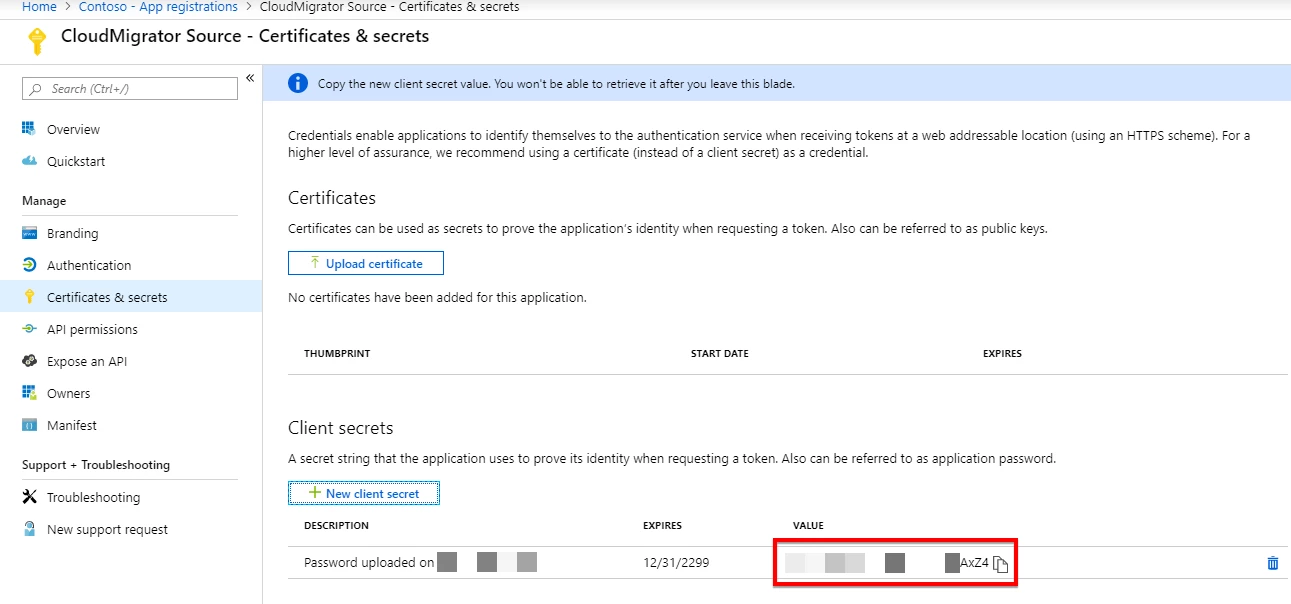
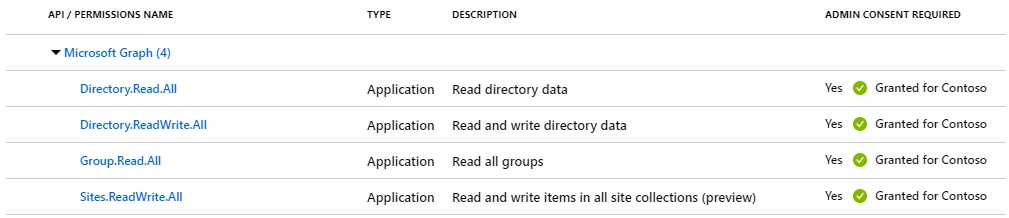
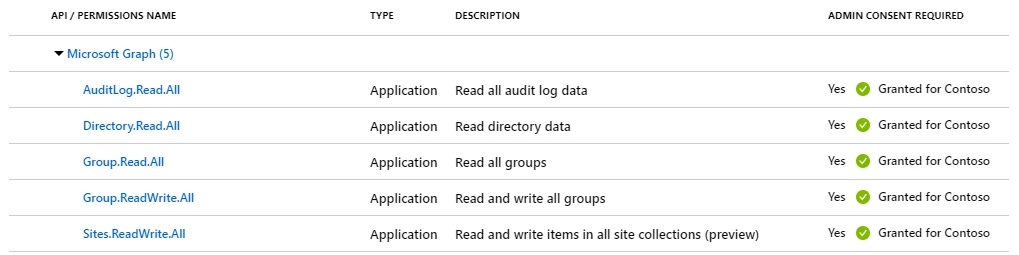
Office 365 Groups Azure App Registration
The following steps are required to migrate from/to Office 365 Groups.
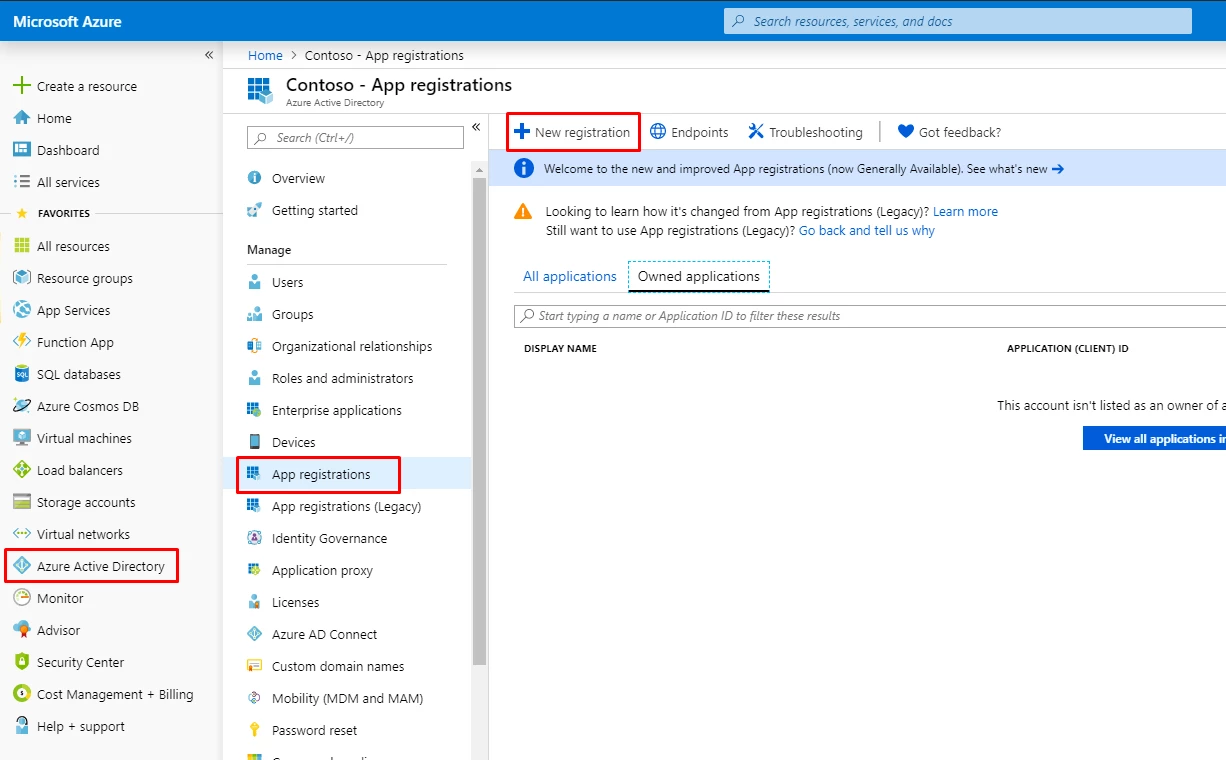
- Enter a name for your application (This can be changed at any time).
- Supported Account Types should be left as the default 'Accounts in this organizational directory only (NAME OF COMPANY)'
- Redirect URI is not required.
- Click 'Register'
 Office 365 Groups as a Destination
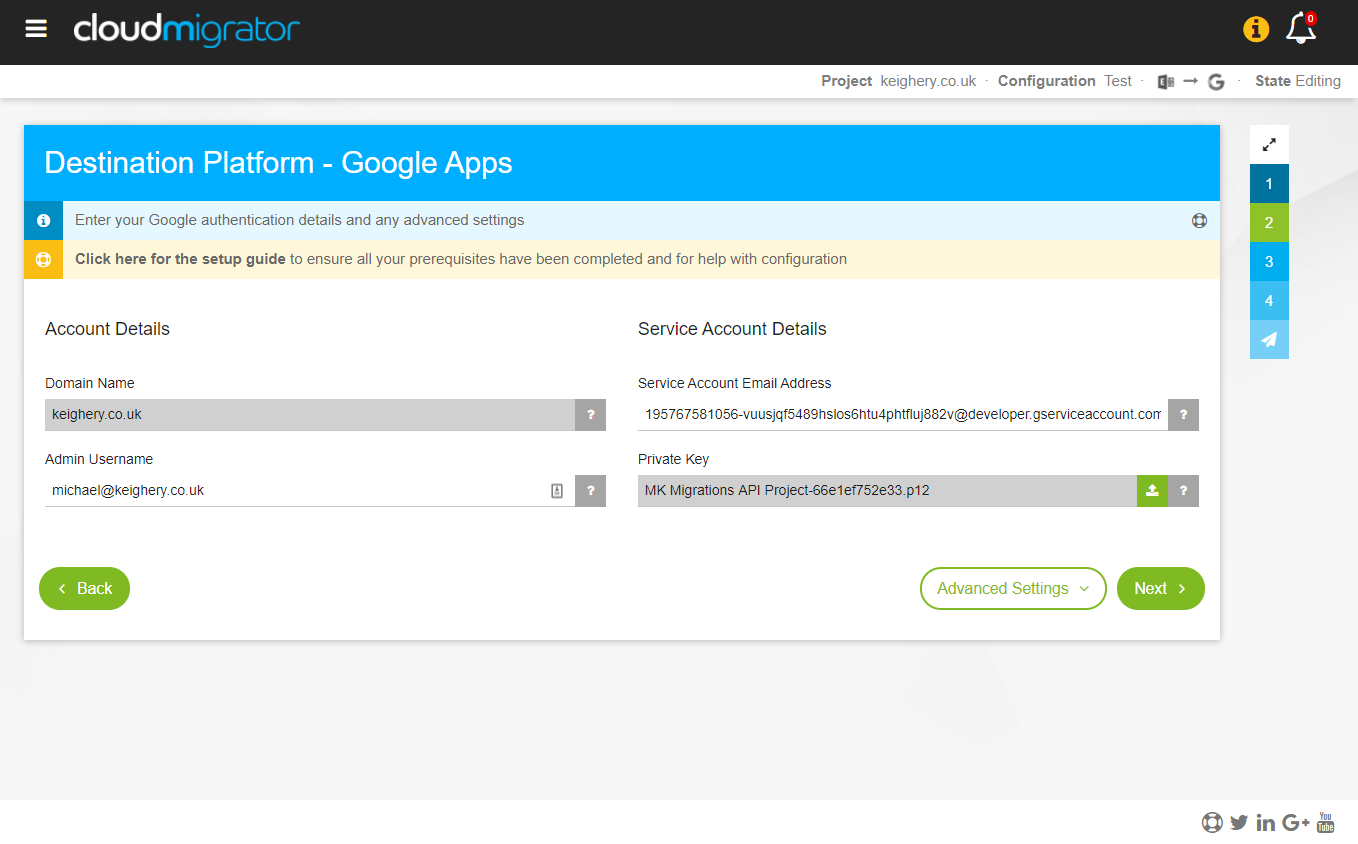
Setting up a service account and Google APIs
In order to access your users' email, files etc. you will need to create a google project and set up a service account. You will also need to enable the relevant APIs.
Firstly, go to your google cloud console, (login as an administrator if you are not already) and click 'Project' at the top and then 'Create Project'.
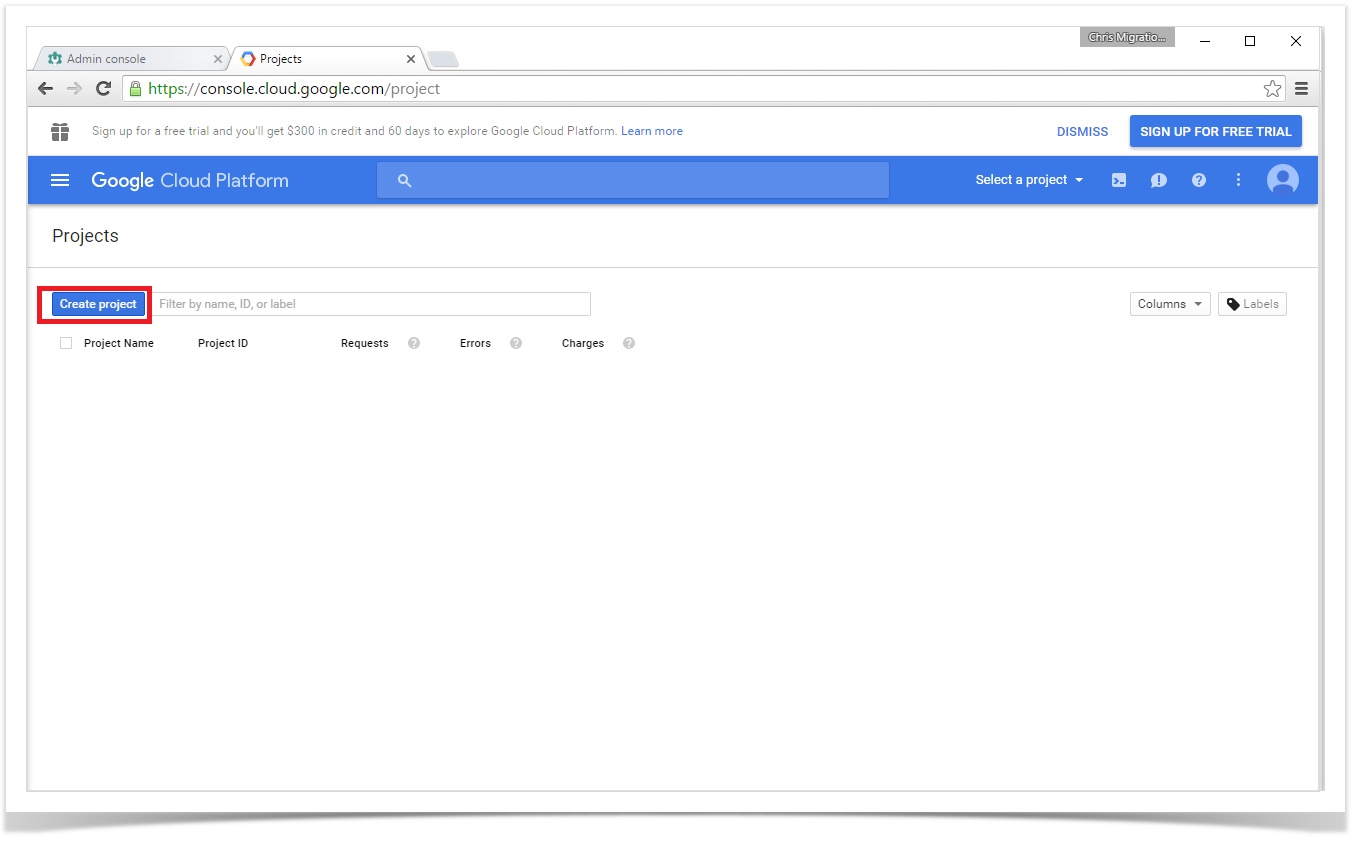
Enter a name for your project and click 'Create'.
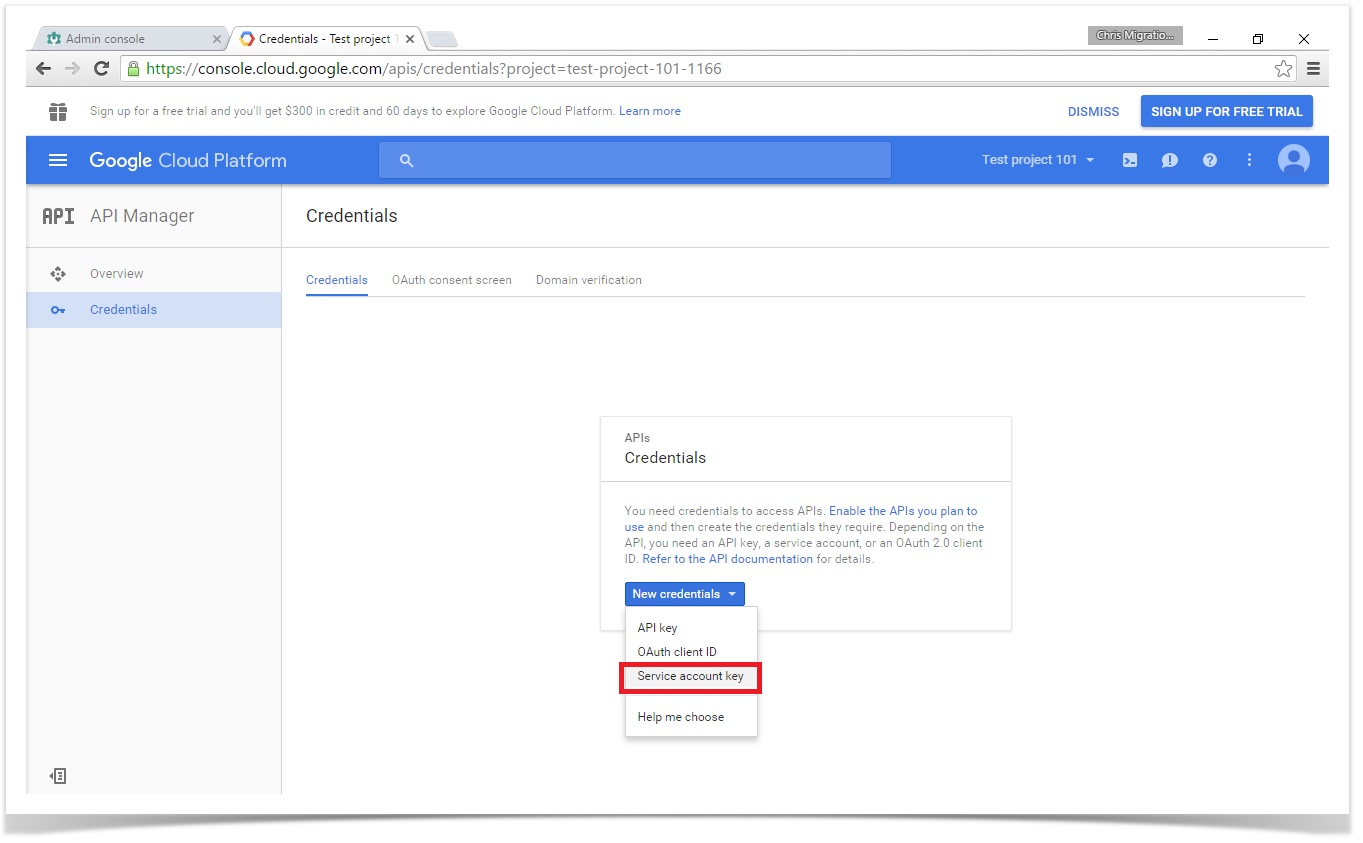
When you have created your project, click on the options menu in the top left of the page, then 'API Manager', then 'Credentials'. Click on 'New credentials' and then 'Service account key'
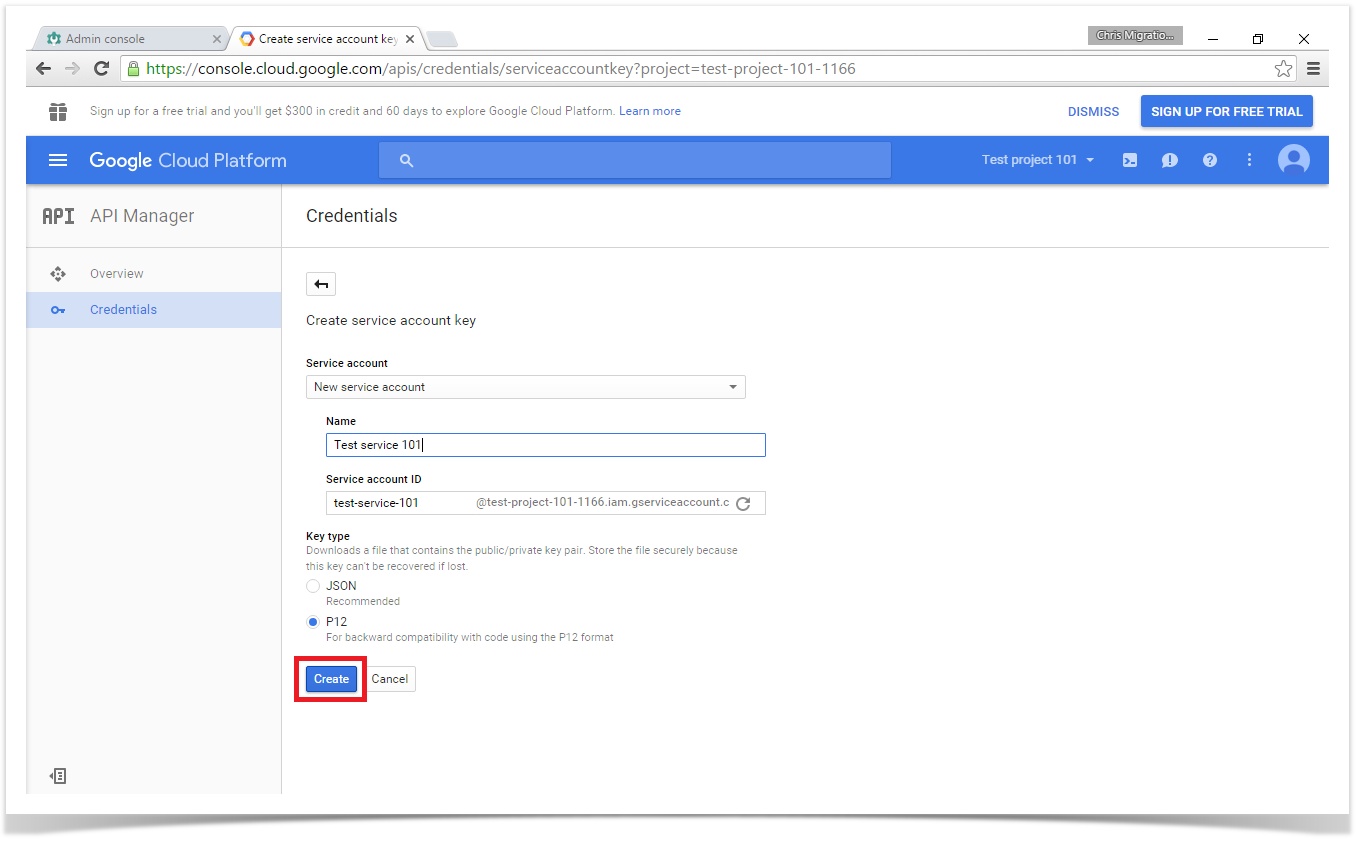
Next, select 'New service account', name it anything and select 'Project' and then 'Owner' as the role from the dropdown list, finally select P12 as the key type and click 'Create'. Upon clicking 'Create', a P12 file will be downloaded; this is important for later so keep a note of where you downloaded it.
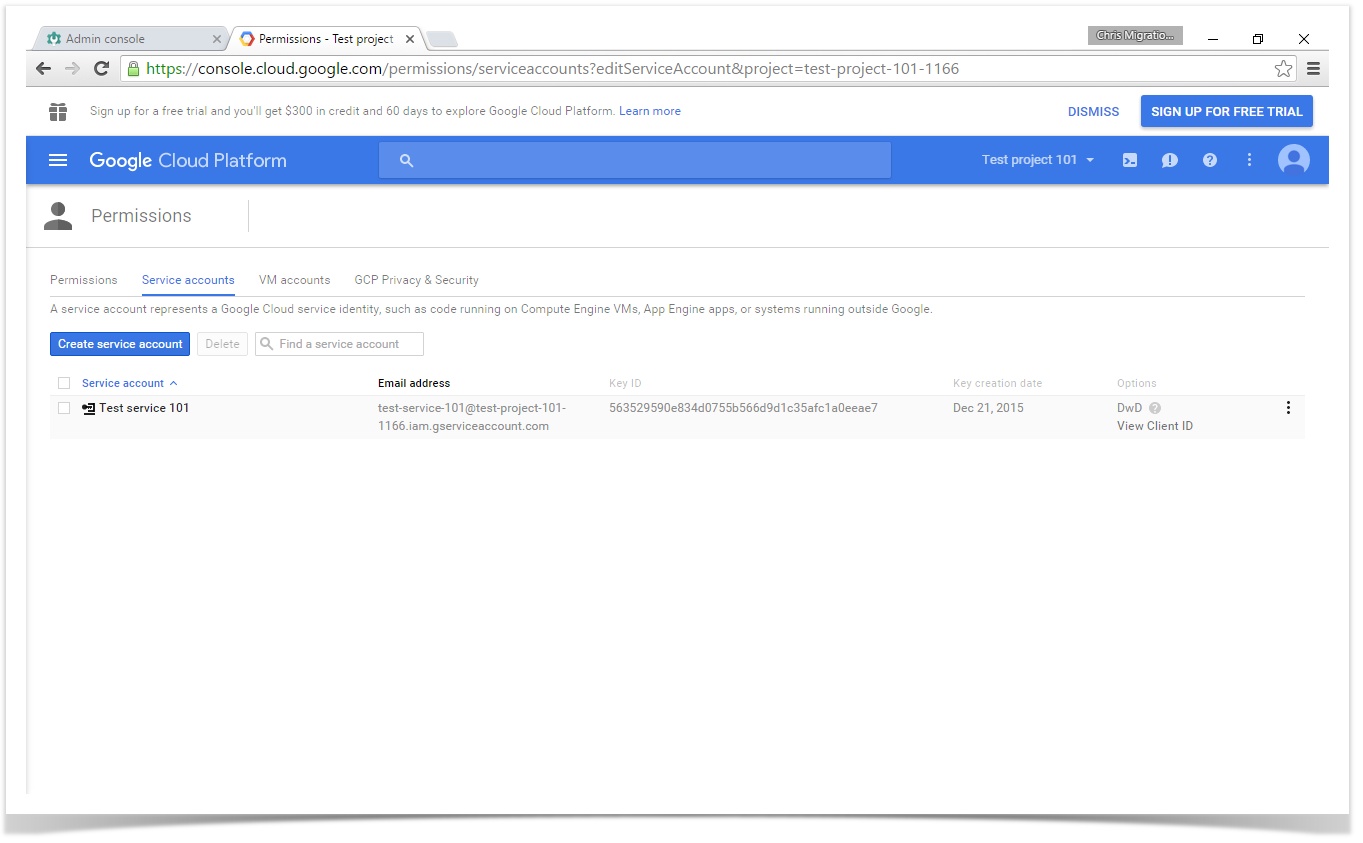
Dismiss the dialog box and on the right hand side of the page, click 'Manage service accounts' and click the three dots beside your service account, then select 'Edit'
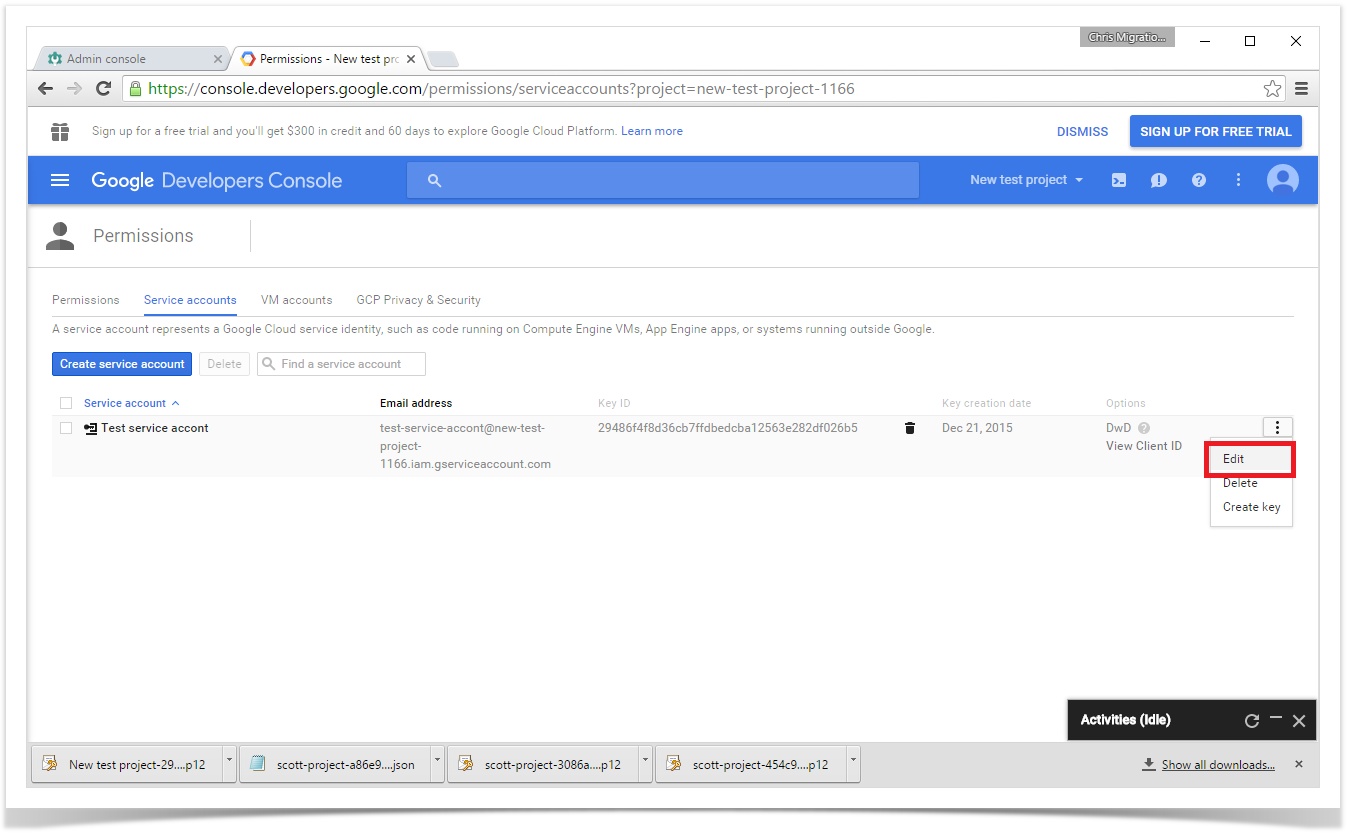
You should now be met with the edit service account window, check 'Enable Google Apps Domain-wide Delegation' and click 'Configure consent screen'.
Next, give your product any name you wish and click 'Save' to be taken back to the previous window. Click 'Save' again.
Now make a note of the email address of the service account you just made as you will need this later to configure CloudMigrator. Click 'View Client ID' in the right most column of the service account table and make a note of that too.
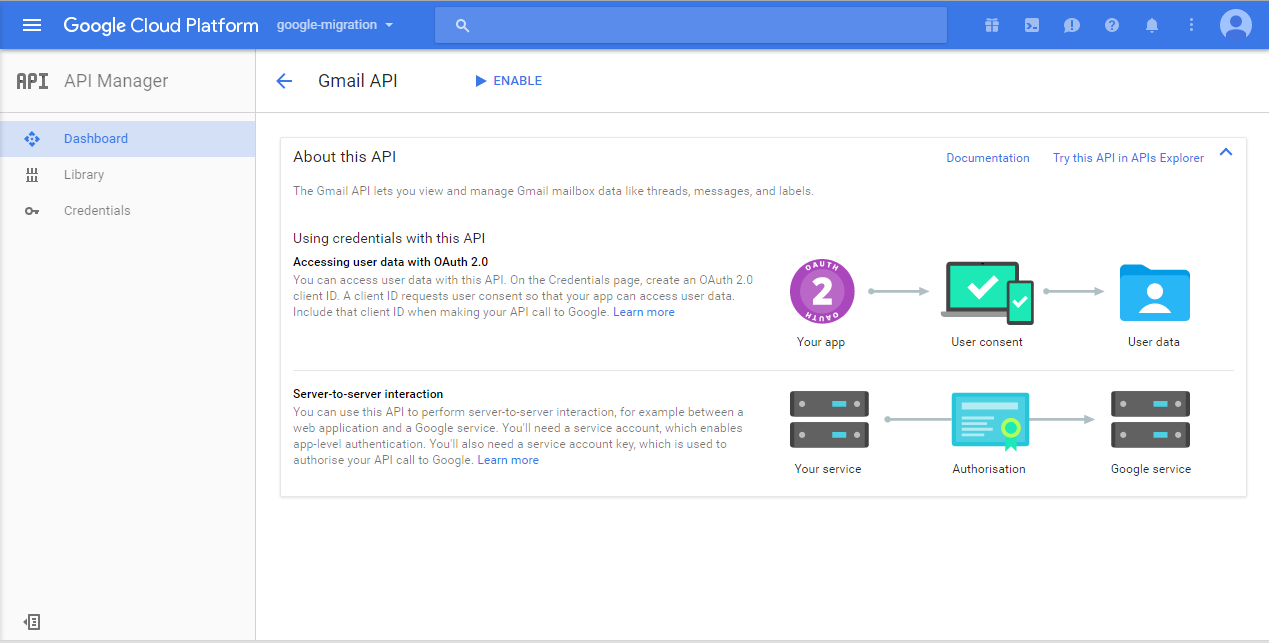
Next, click on the options menu again, then 'API Manager', then 'Library'. This will take you to a page where you can search for and enable various google APIs, just use the search box and the enable button at the top of each APIs respective page to enable to following APIs.
- Admin SDK
- Drive API
- Gmail API
- Calendar API
- Contacts API
- Tasks API
- Groups Migration API
Nearly there! Once all the APIs are enabled, launch the Google Apps Admin Console for your source domain.
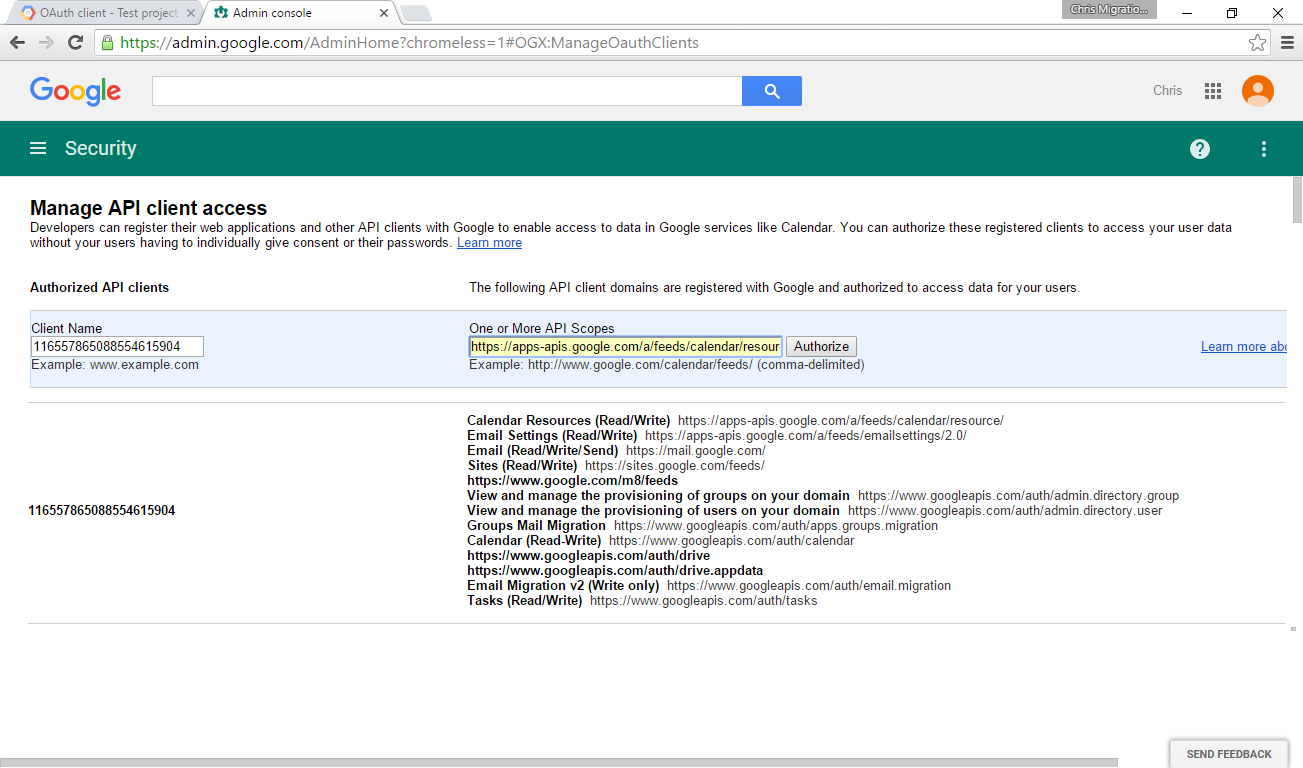
Go to 'Security', then to 'Show More', then to 'Advanced Settings' and then finally to 'Manage API client access'. Enter the Client ID you noted earlier into the 'Client Name' field and paste the following into the 'Scopes' field:
https://www.googleapis.com/auth/admin.directory.resource.calendar, https://www.googleapis.com/auth/gmail.settings.sharing, https://mail.google.com/, https://sites.google.com/feeds/, https://www.google.com/m8/feeds, https://www.googleapis.com/auth/admin.directory.group, https://www.googleapis.com/auth/admin.directory.user, https://www.googleapis.com/auth/apps.groups.migration, https://www.googleapis.com/auth/calendar, https://www.googleapis.com/auth/drive, https://www.googleapis.com/auth/drive.appdata, https://www.googleapis.com/auth/email.migration, https://www.googleapis.com/auth/tasks, https://www.googleapis.com/auth/gmail.settings.basic
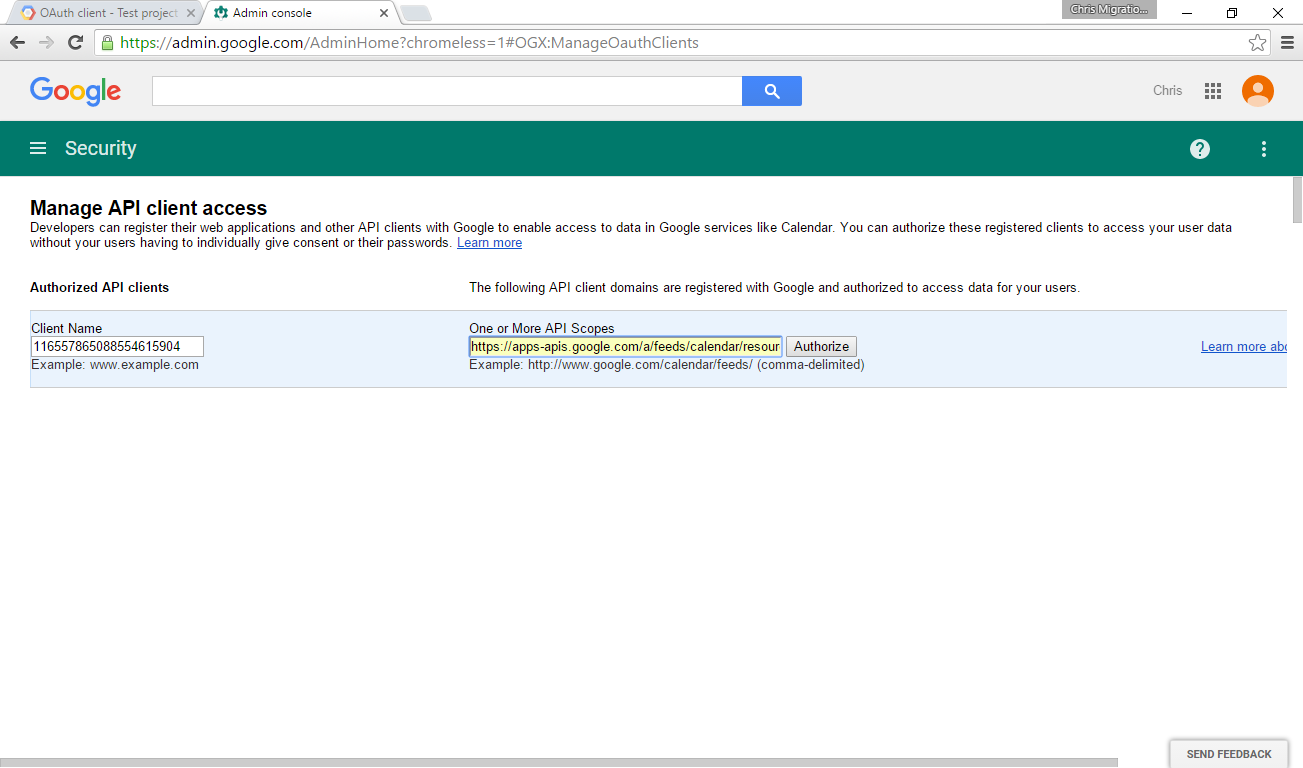
Finally, click on 'Authorize' on the right on the 'Scopes' field and an entry for your Client ID and its associated now-accessible APIs will appear. Do this for both the source and destination domains.
If you have not already done so, create a new configuration item by clicking the plus button and then "create a new configuration to get started".
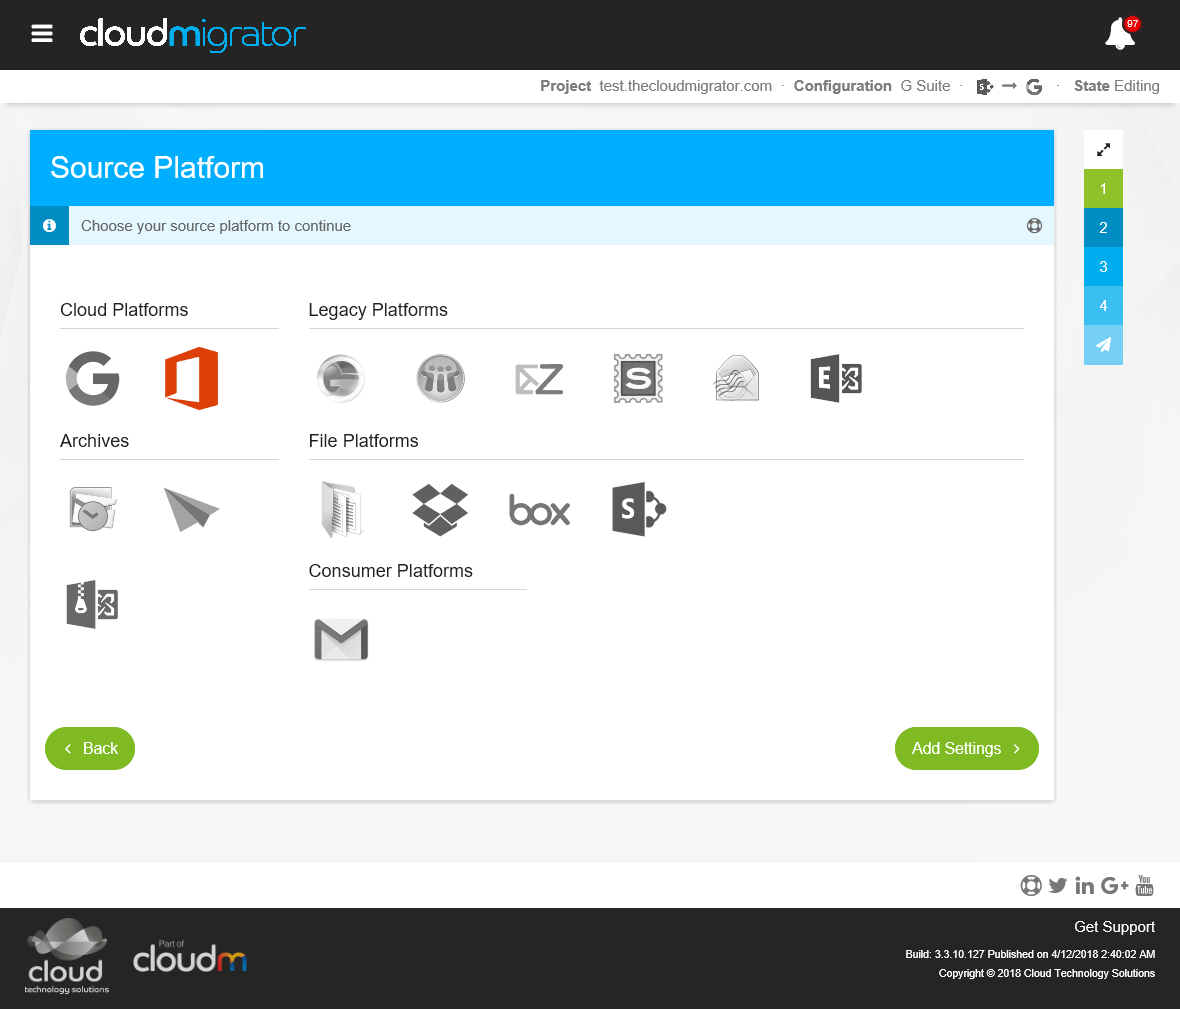
Select the Hosted Exchange configuration item.
You should also supply a license key here before you continue. If you do not supply a key you will be able to setup and configure CloudMigrator but will not be able to perform a migration.
To enter this key, hover over the orange gear in the actions column and navigate to "View license" (one icon to the left) and you will be prompted to apply a license. Alternatively, you can click the name of the unlicensed configuration.
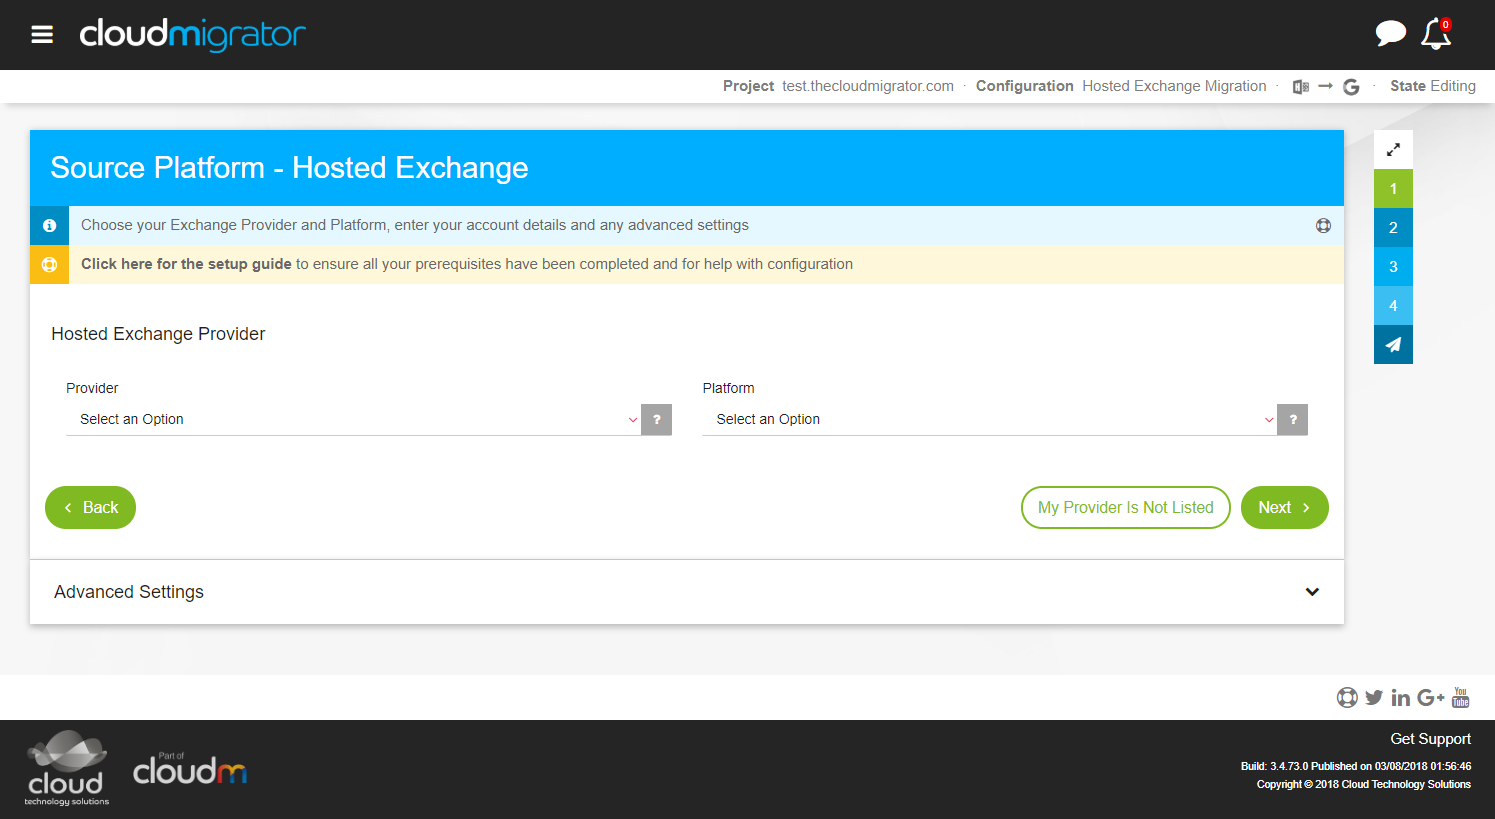
Choose Hosted Exchange as the migration source and enter your Hosted Exchange settings into CloudMigrator and then click next.
- Autodiscovery Service URL – In order to connect to the correct server, autodiscovery is used to obtain the server information. Input the URL to the autodiscovery service for your domain. The value for your Microsoft Exchange server is like https://yourserver/autodiscover/autodiscover.xml.
- Admin Username – Enter the full email address of your Microsoft Exchange admin user.
- Admin Password – Enter the password of the admin user.
- Domain Name – Enter the domain name you will be migrating from. This should be the Internet domain name, not the local domain name.
- Test User Name – Enter an email address of an active user within your Microsoft Exchange system. This account is used to test connections as in most cases the admin account will not be mailbox enabled.
If your Hosted Exchange provider is listed, select it from the list of providers and the server details will be populated. If your provider is not listed, select 'My Provider is Not Listed' and enter the below details.
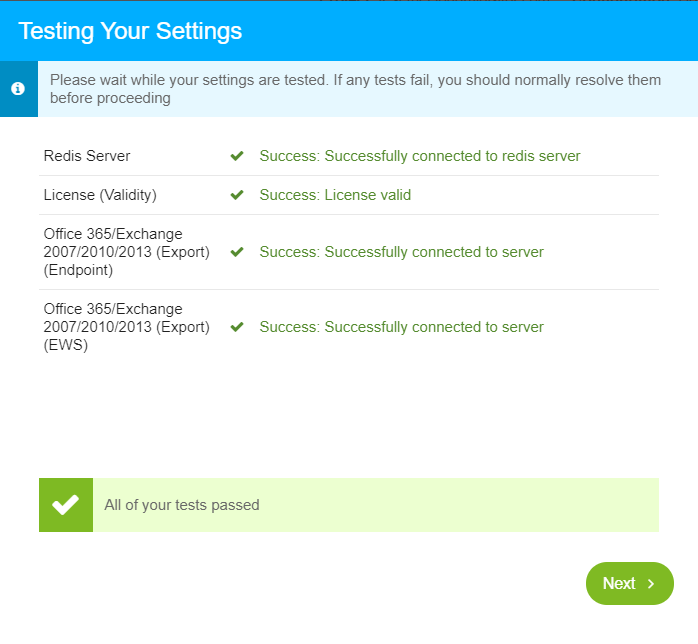
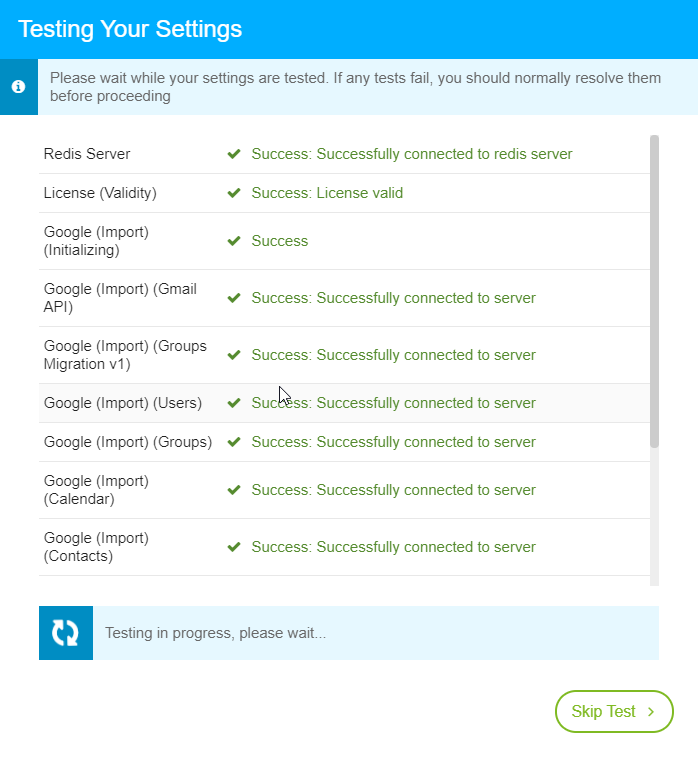
CloudMigrator will now perform a small connection test to verify that the details you have entered are correct. If this fails you may have entered something incorrectly. If you are failing to resolve the issue please contact CloudMigrator Assist via the chat icon.
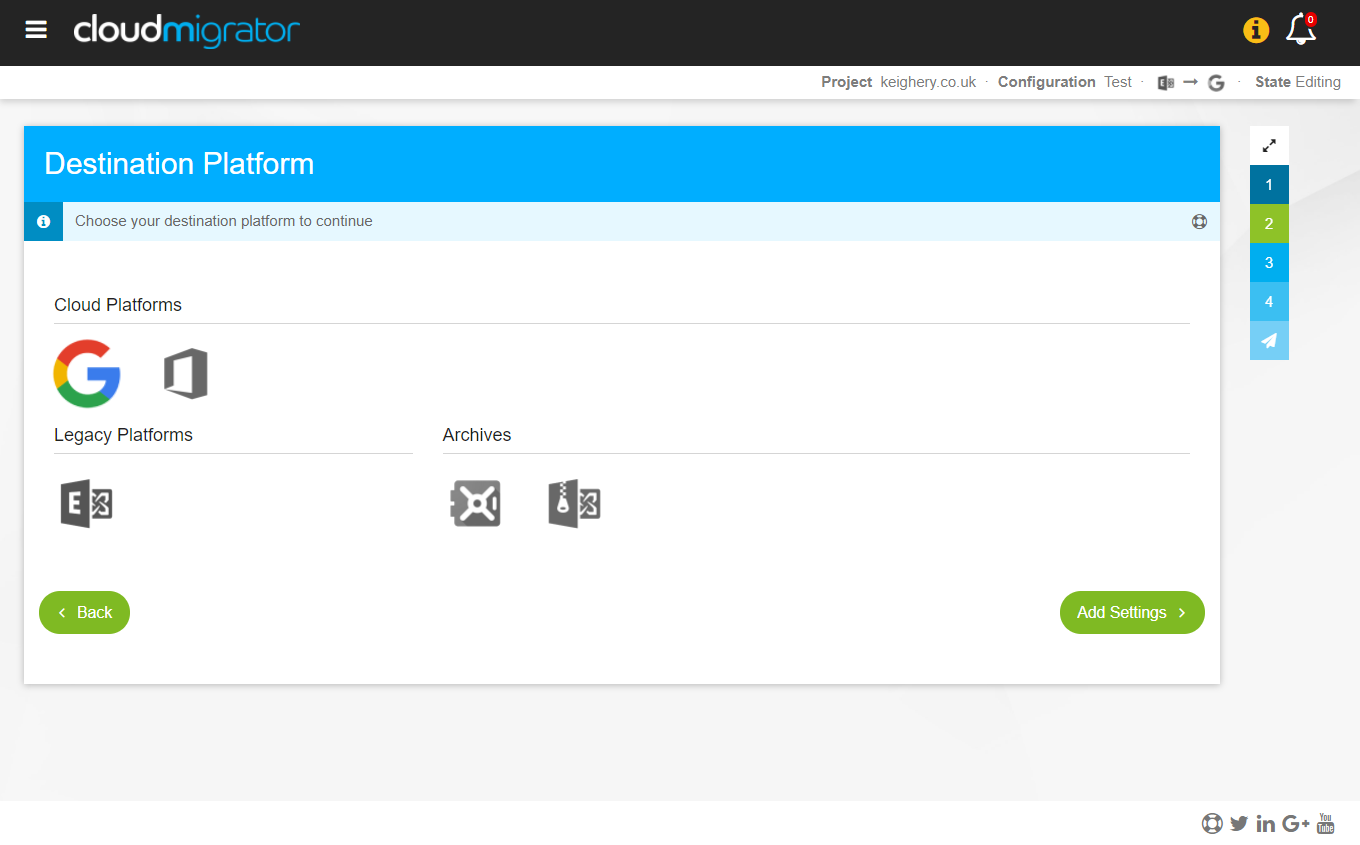
Select G Suite as your destination platform.
Select where you would like your data to be migrated. If you have purchased GSuite for Business or Google Vault you may want to migrate data directly into Google Vault.
To enable Google Vault for your domain, please see the following article: http://support.google.com/vault/bin/answer.py?hl=en&answer=2584132
Enter information for your G Suite admin account.
CloudMigrator will perform a connection test against your GSuite domain to verify that everything has been entered correctly.
If your GSuite system is brand new or for any reason the users being migrated have not been created in GSuite, CloudMigrator can create your users for you. Simply go to advanced settings, to the user settings section and enable Create Users.
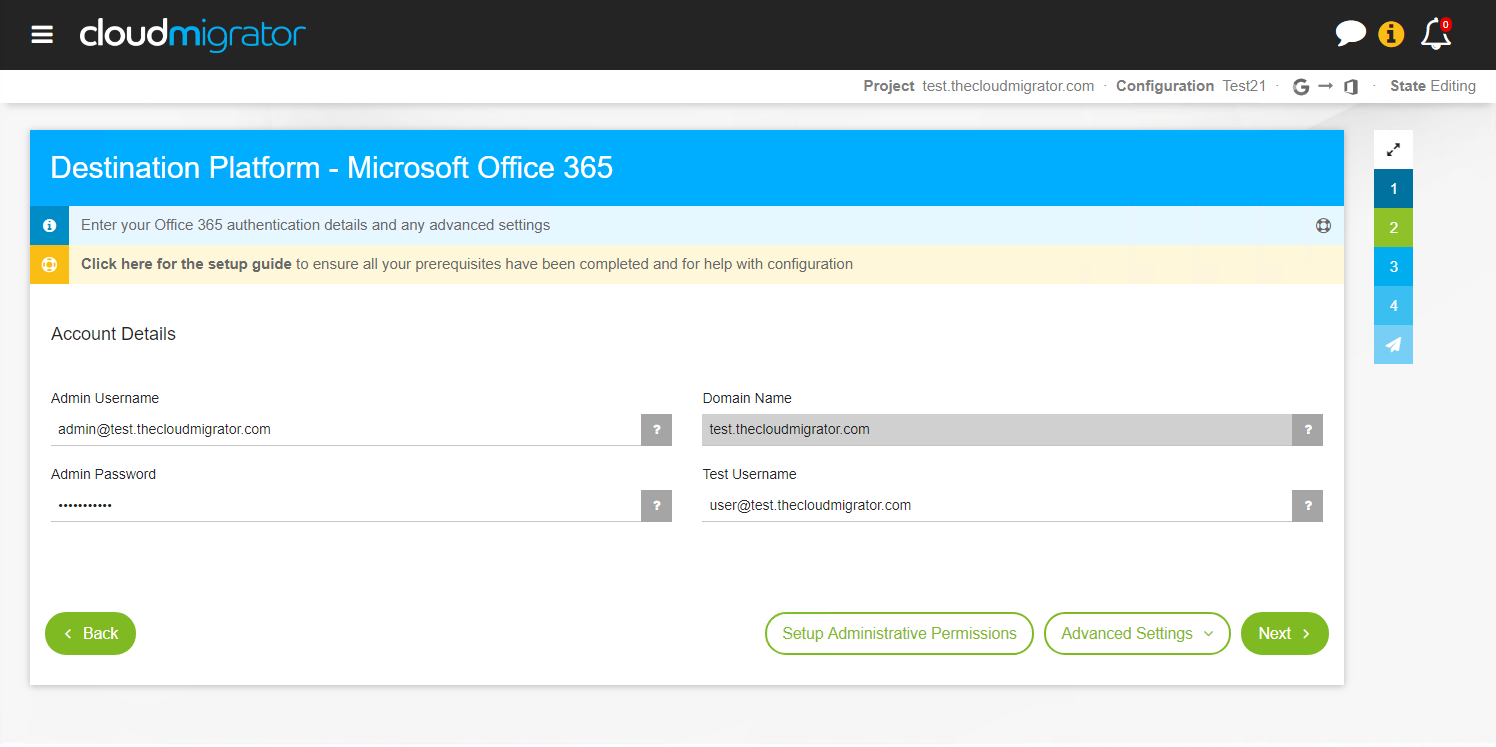
Select Office 365 as your destination platform.
Enter information for your O365 admin account.
- Admin Username - The email address of an administrator within your Office 365 environment.
- Admin Password - The password for the administrator account specified earlier.
- Domain Name - The domain name of your Office 365 environment, this might be the part after the @ in your administrator email address. If migrating from several different domains, several migrations will be needed.
- Test Username - A non-admin user who is already present in the system.
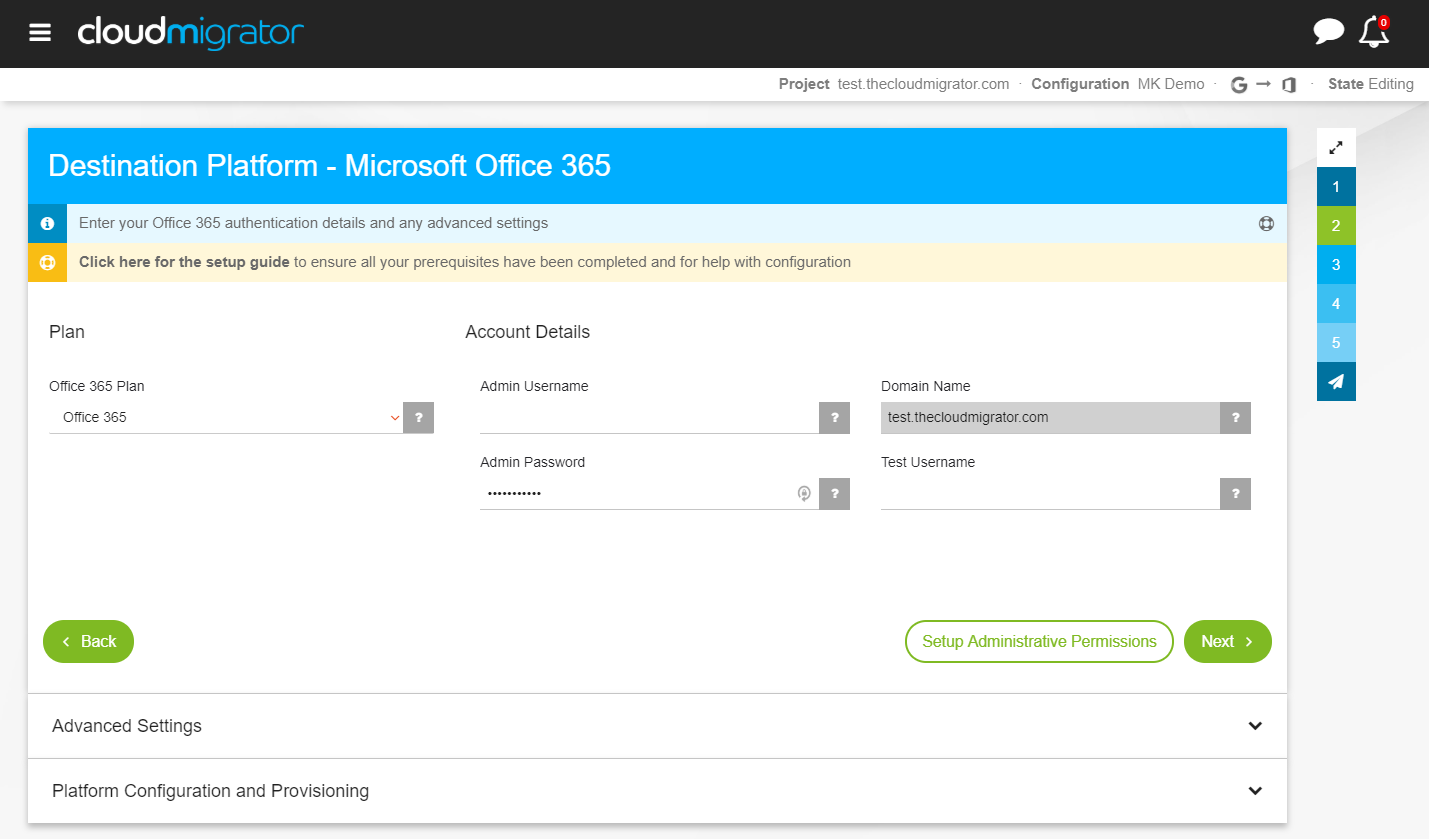
CloudMigrator will perform a connection test against your O365 domain to verify that everything has been entered correctly.
If you are on a Small Business or Kiosk plan and need to use delegated access to migrate from Office 365 then you need to make an advanced settings change. Click Advanced Settings and under the Account Details section select Credential Method and change it to Delegated Access.
CloudMigrator includes a number of platform configuration and provisioning options for Office 365 migration that enable advanced automation scenarios. These options can be executed during the migration process and will run as part of the migration of users' data. See here for detailed information.
There are special considerations when you need to preserve the user's domain in the target tenancy. This is because you cannot have the same domain in two Office 365 tenancies at the same time. The recommended approach to achieve this is detailed below:
- All users to be migrated in the source tenancy will have a primary SMTP email address ending in their current domain e.g. 'user@company.com'. Check that each of these also has at least one alias. This will be needed later to avoid having to delete users in order to stop mail going to their original mailboxes
- Provision users mailboxes in the target tenancy with their primary SMTP email addresses based on the '.onmicrosoft.com' domain.
- Configure CloudMigrator with the target domain based on the new tenancy's '.onmicrosoft.com' domain. This will be used for both the bulk migration pass and the delta pass.
- On completion of the delta pass, all the users should have their current primary SMTP address switched to their alias. This will in-affect stop mail from being received and be the start of the mail 'down-time'.
- Remove the 'company.com' domain from all users in the source tenancy. It is essential that no objects remain assigned to this domain otherwise you will not be able to remove the domain from the tenancy.
- Remove the 'company.com' domain from the source tenancy.
- Add the 'company.com' domain to the target tenancy
- Assign the 'company.com' domain to all the users in the target tenancy and make this the primary SMTP email address
- This ends the 'mail down-time' as mail will now successfully flow to the users again in the new tenancy.
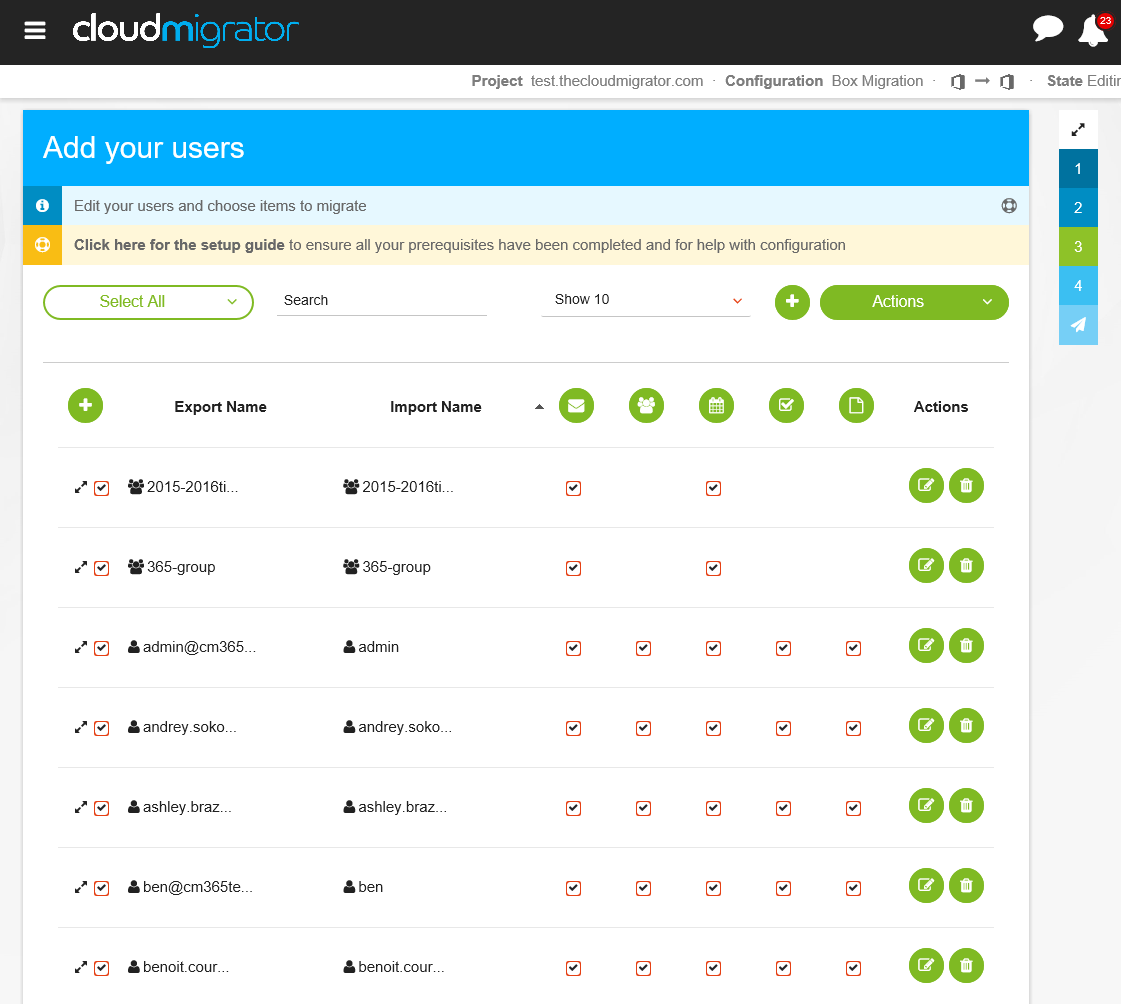
It's now time to add which users you'd like to migrate.
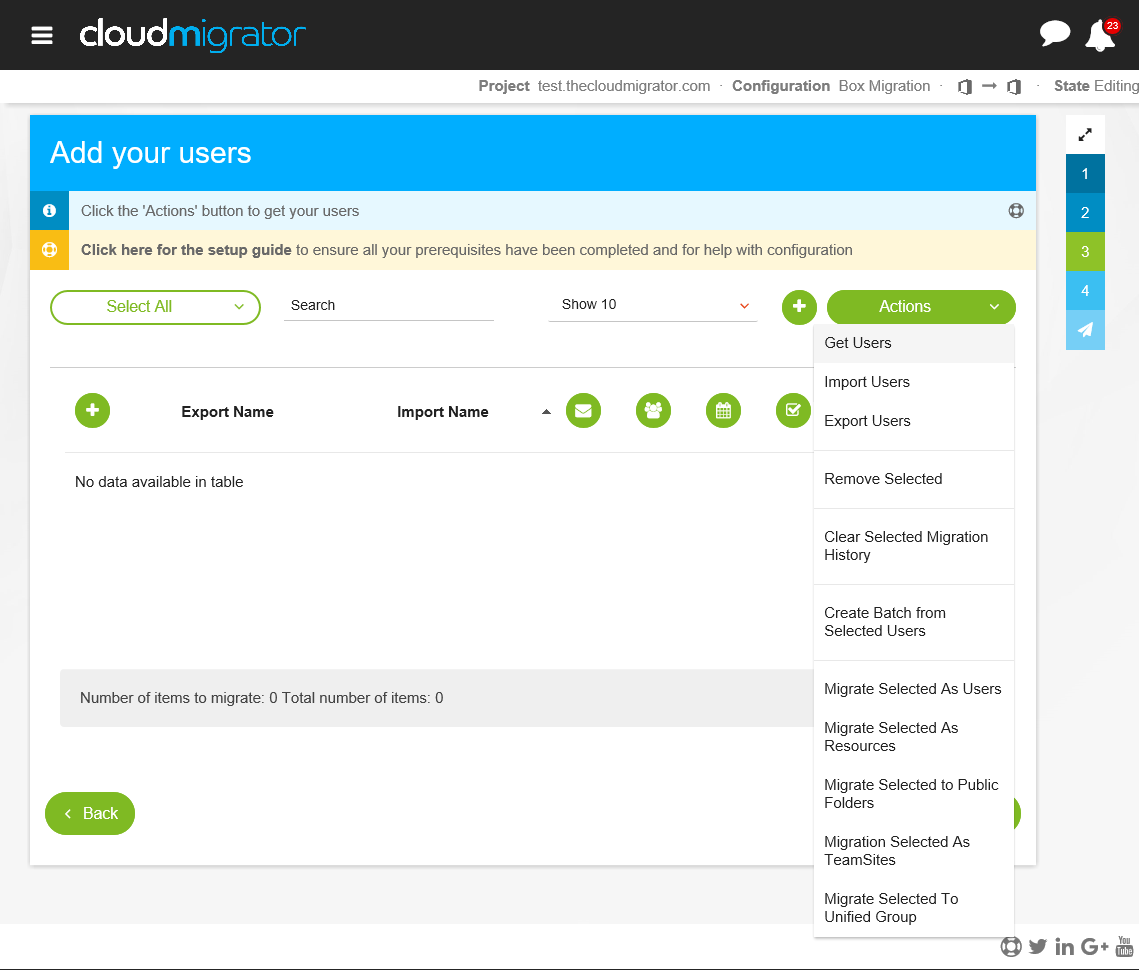
Unfortunately when migrating content from Hosted Exchange you will not be able to use the Get Users button from the actions menu. You can manually import users via a CSV file using the Import Users option or simply add them individually via the plus icon .
At this point you can choose what to migrate for each user, when migrating from Hosted Exchange you can migrate
Enter your user's full email address within the Export Name field. If you have already created your GSuite users then you will just need to enter their username.
If your provider does not support delegated access or application impersonation, you must enter your user's passwords in the Password field.
To migrate files to a GSuite Team Drive, either select the item you wish to migrate and select 'Migrate as Team Drive' from the actions menu or specify the import type as 'TeamDrive' when adding an item. You can then specify the name or ID of the Team Drive in the 'Given Name' field. If the Team Drive specified doesn't exist then it will be created. You can use a unique ID in the 'Import Name' field to identify the Team Drive across multiple migrations. You can specify a specific folder to migrate from in the 'Documents Path' field, this will migrate only the specified folder and all subfolders. Finally, you must make sure your migrating account has organizer permissions for any Team Drives that are being migrated.
CloudMigrator lets you decide how much content you'd like to migrate to your shiny new system.
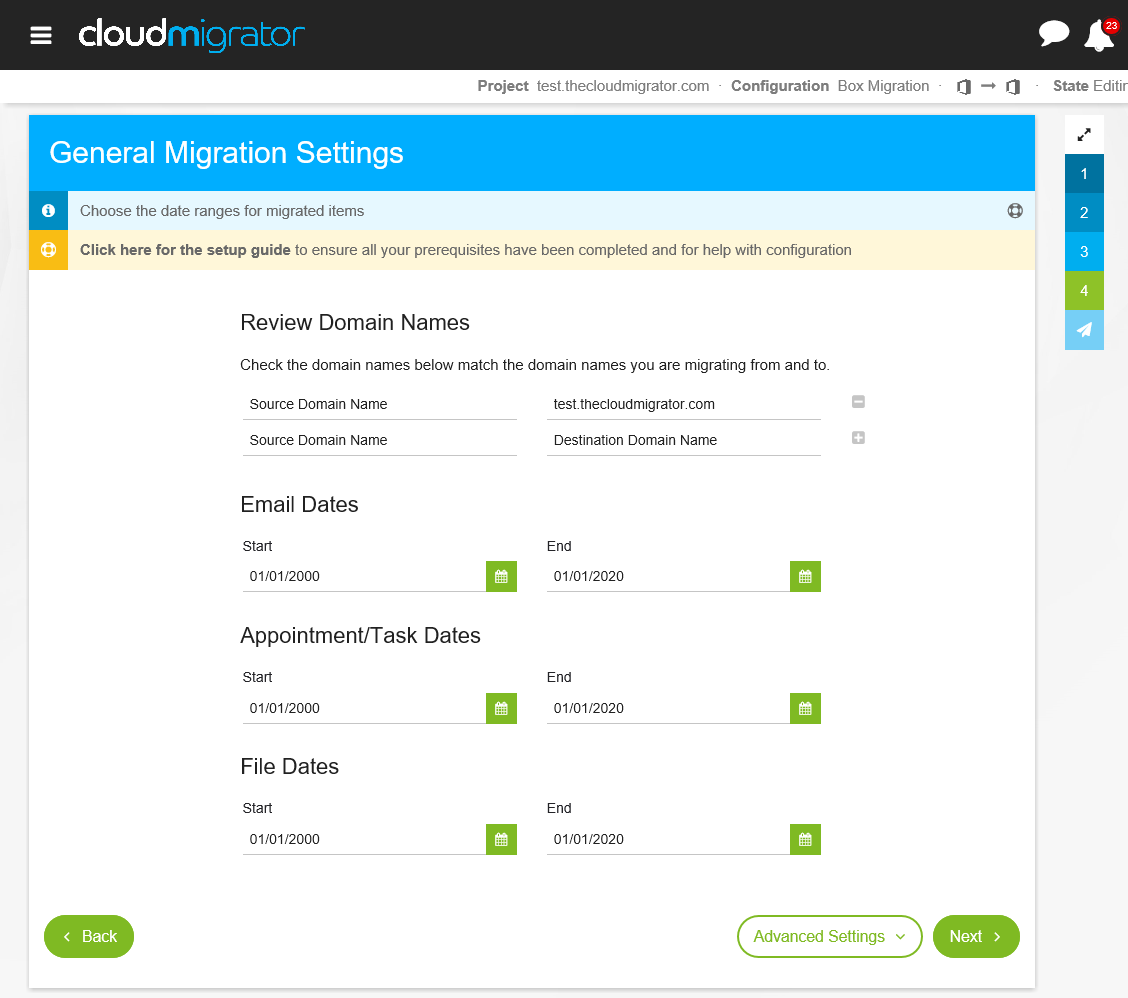
If you are changing your email address as part of the migration you can verify that the domain names are correct here. You can also specify specific address replacements in the respective section of the advanced settings.
For more information on domain and address replacements, see this page.
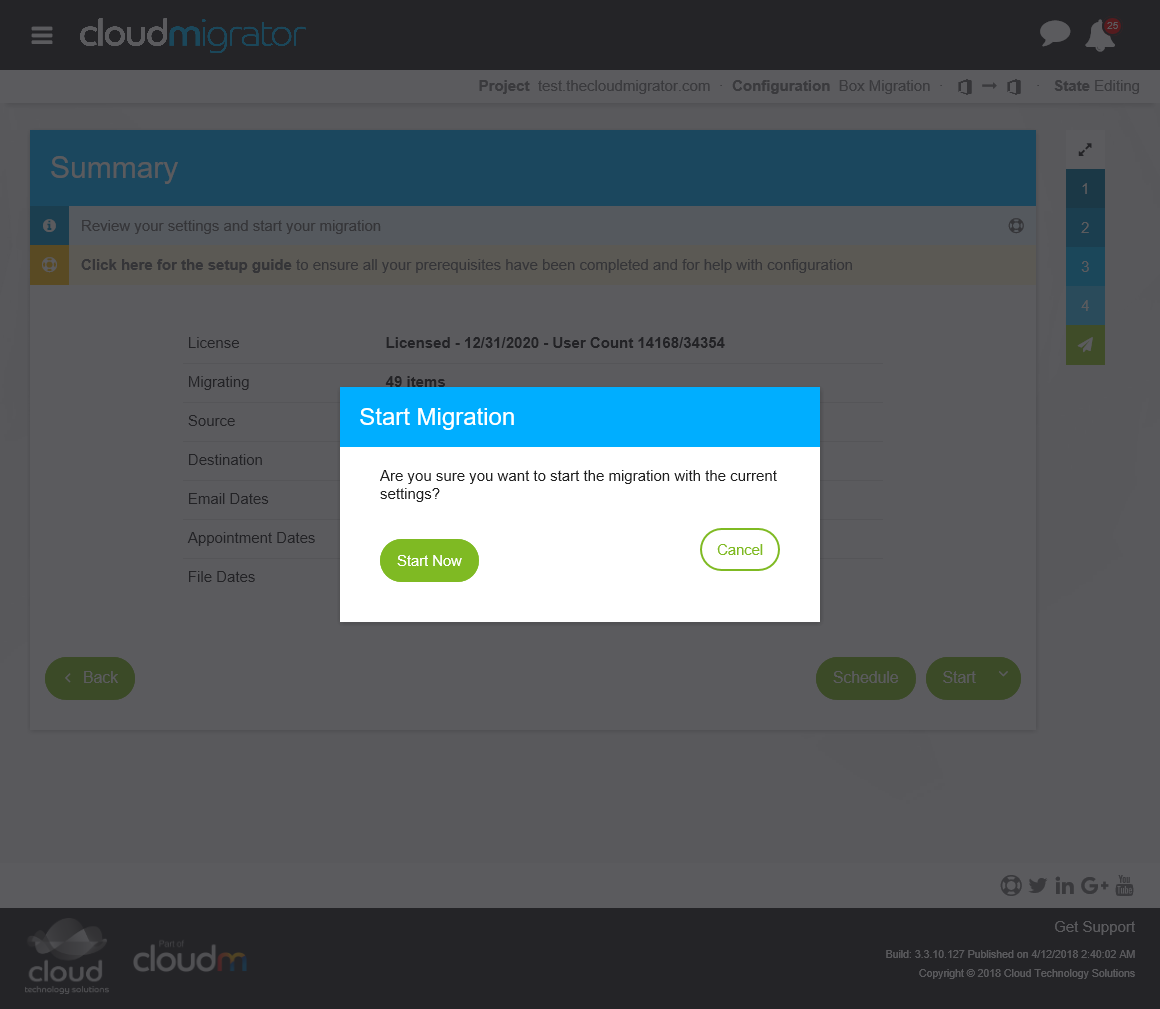
Before you start your migration, you must supply a license key. If you have not supplied this key in step 2, you can do it now by clicking the bold link in the red bar at the top of the page. If you do not see the red bar then you are already licensed and don't need to worry!
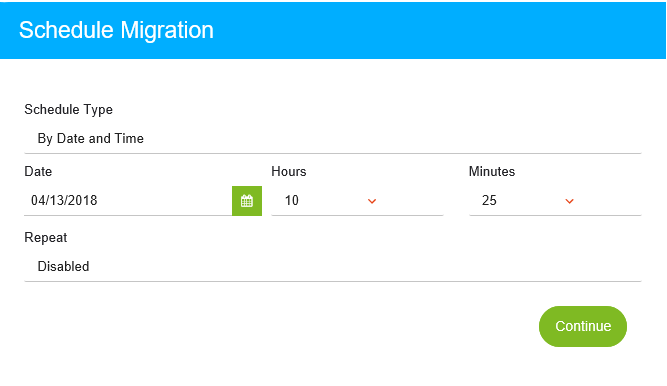
We know that you may want to start your migration in the middle of the night, or over the weekend, but we don't expect you to stay up in order to do so. With CloudMigrator you can decide to schedule exactly when you'd like the migration to occur.
Start the migration.
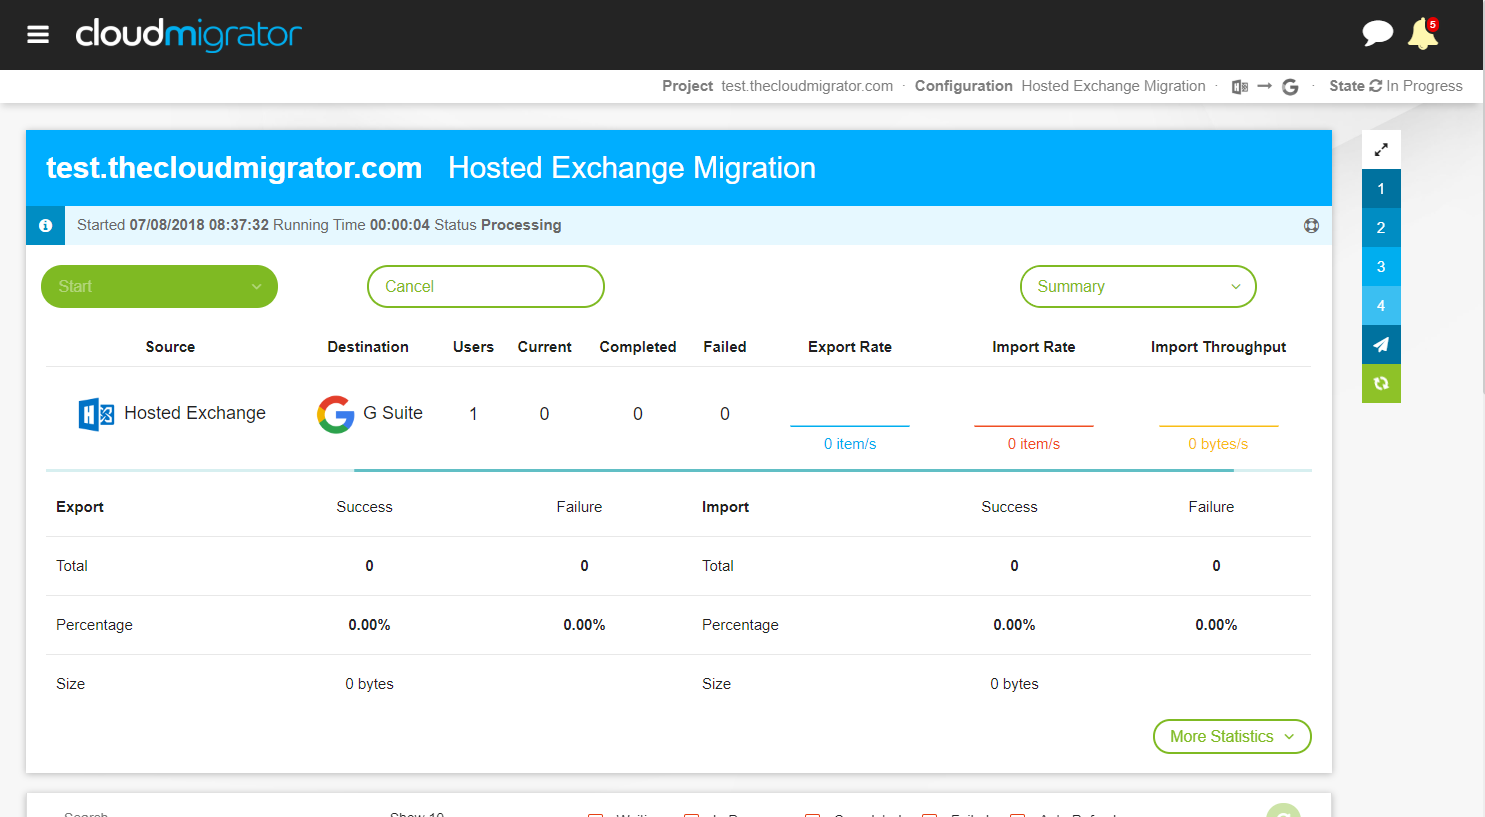
During the migration process CloudMigrator will report back in real time exactly who is being migrated and the items being processed. All you now need to do is sit back, relax and wait for your migration to complete.
Check the progress of your migration.
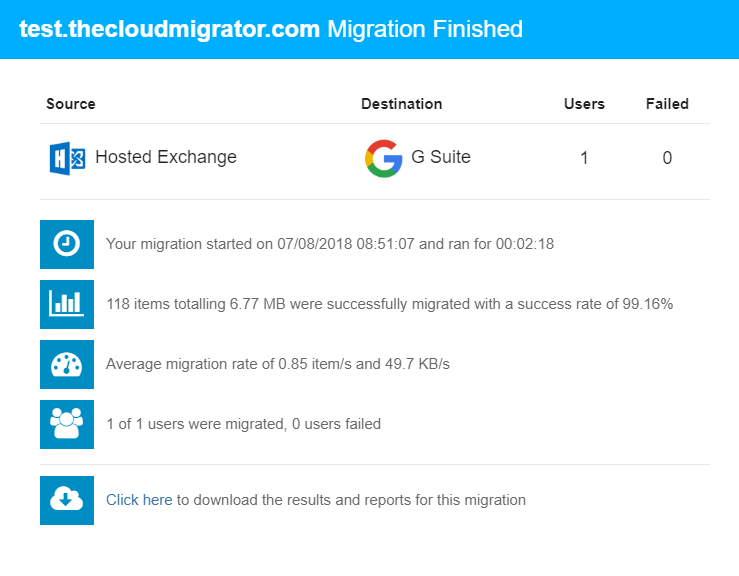
Once complete you can download a full report for your migration.
For more information about this page, please visit the summary page.
While the default options are recommended for the majority of users, CloudMigrator gives users the ability to customise their migration experience. The following are the advanced options available to those migrating from Hosted Exchange.
Account Details
- Direct Exchange EWS URL - For Office 365 you should use autodiscovery and not specify anything for this setting.
- Authentication Method - Choose the authentication type that will be used with the server. For Office 365 this will normally be set to 'Basic'.
- Use Workstation Credentials - Use the credentials of the logged in user rather than the provided credentials. Use this for NTLM, Kerberos or other authentication methods which require the Windows identity. This setting generally is irrelevant when migrating to/from Office 365.
- Credential Method - If you have setup Application Impersonation as described earlier in this page then you should specify Impersonation for this setting. If you have not setup Application Impersonation (or cannot use it for some reason), then choose either Delegated Access (for BPOS for example) or User Credentials. If using User Credentials then the user’s passwords on the Users tab must be correct.
Transfer Settings
- Retry Count - The number of times an operation will be attempted before failing.
- Timeout - The maximum time, in milliseconds that communication will be attempted.
- Use X-AnchorMailbox Header - When using application impersonation, use the X-AnchorMailbox header to improve performance.
Calendar Timezone
- Exchange 2010 Calendar Timezone - The default timezone to use with appointments when migrating from Exchange 2010 when the timezone is not identified by other means.
Public Folders
- Include Public Folders in User List - Specifies whether Public Folders will be obtained when getting a user list.
- Public Folder Username - The primary SMTP email address of the user that will be used when migrating Public Folders. This user must have an active mailbox.
Message Options
- Excluded Item Classes - Specify the list of item classes that will not be processed as part of a migration. Exact matches are made on the value specified here.
Other Options
- Migrate Account Delegates - Migrate account delegation and sharing permissions.
- Migrate Signature - Migrate user signatures.
- Migrate Out Of Office - Migrate user out of office settings
While the default options are recommended for the majority of users, CloudMigrator gives users the ability to customise their migration experience. The following are the advanced options available to those migrating to GSuite.
Transfer Settings
- Migration Base URL 1.0 - The base URL for email migration using v1 of the email migration API. This should only be changed for specialized migration scenarios and for normal migrations should not be altered.
- Migration Base URL 2.0 - The base URL for email migration using v2 of the email migration API. This should only be changed for specialized migration scenarios and for normal migrations should not be altered.
- Timeout - The time in milliseconds that the tool has to complete sending a transaction to Google before an error occurs. This should be set high enough so that large amounts of data can be sent (further description is available in ‘Migration Strategies’). If a transaction fails using the provided timeout, it will be re-attempted using a larger timeout. While errors occur this will continue with increasing lengths of timeout, up to the retry count. It is better to set this to a very high value to ensure requests get through.
- Maximum Batch Size - This is the maximum size, in bytes, of a single transaction with the Google servers. Note: The absolute maximum size of any transaction that Google Apps allows is 32MB. Because of the way that messages are created and encoded (XML OR JSON, which is then Base 64 encoded) it is not usually possible to know the exact size of a message until it is created. Messages can be sent in batches, which also make it more difficult to establish the exact size of each transaction. Large batches also increase memory usage significantly and it is recommended that the maximum value of 5MB is used. This setting also has an impact on how long a single message will take to transmit to Google Apps and can therefore affect the requirements for the Timeout setting.
- Maximum Batch Count - The number of items that will be sent in a batch when transferring contacts and calendar items.
- Retry Count - The number of times a transaction with the Google servers will be retried if it fails. Note: A transaction could fail for one of a few reasons. If the transport layer fails, that is a transaction could not get through to the Google servers or the transaction times out, then the transaction will be attempted again until the retry count is met – with an increasing timeout value each time. Another possible reason for failure is that the client is sending too many requests per second. In this case, an exponential backoff system is employed where the tool waits for a period before retying any failed transactions (or parts of transactions).
- Modify Request - Leave at the default unless instructed by support.
- Custom Parameters - Adds custom headers to Google API requests, for debugging only.
Calendar Options
- Force Appointment Acceptance - Set this to true to force all appointment recipients' attendance as confirmed.
- Appointment Privacy - Set the visibility of all appointments. Original will use the privacy setting from the source system, while the other settings will override the original setting and set the specified visibility.
- Maximum Attendees - Set the maximum number of attendees for any migrated appointments.
- Default Calendar Timezone - Set the default calendar timezone to use for recurring appointments which have no timezone set in the source system and where the target Google calendar is in UTC.
- Send Individual Events - Send appointment events as individual items rather than as a batch. Performance is slower than in batches, but may help with some rare issues with rate limiting.
- Color Categorized Appointments - If the appointment had a category in the source system, apply a colour to all appointments of that category.
- Migrate Attachments - Migrate appointment attachments to Google Drive and share with attendee.
Document Options (File and Attachements)
- Convert Text - Where possible, convert text and word documents to the Google Documents format.
- Convert Spreadsheets - Where possible, convert spreadsheets to the Google Documents format.
- Convert Presentations - Where possible, convert presentations to the Google Documents format.
- Convert Drawings - Where possible, convert drawings (*.wmf) to the Google Documents format.
- Convert OCR - Where possible, convert images using OCR.
Email Options
- Archive Inbox EMail - Do not place migrated email from the inbox into the inbox within Google Apps. Instead the email will have a label of 'Migrated Email' applied.
- Apply Inbox Label to Sub-Folders - When a message from the source system was in a folder in the inbox, create the message with both 'Inbox' and 'Folder Name' labels. Set to False to just create the folder label.
- Modify Sent Address - For sent messages, if the sender does not match the email address of the destination account, modify it to match. This is to allow for sent items to display correctly in the Google Apps interface. Default is true.
- Maximum Batch Count - Specify the maximum number of messages in a single batch. Specify 0 to let the tool automatically allocate batches. Only applicable for immediate migrations.
- Email Transfer Delay - Specify the number of milliseconds to wait between sending messages.
- Email Thread Count - Specify the number of milliseconds to wait between sending messages
Document Options
- Collection Naming Scheme - When attachments or files are migrated to Google Drive, choose the collection label scheme that will be applied to the migrated documents.
- Folder Name and Collection Label - migrate documents into a collection based on the folder name the attachment or document originated from, and also apply the collection label specified in 'Collection Name'.
- Folder Name - Migrate documents into a collection based on the folder name the attachment or document originated from.
- Collection Label - Migrate documents into a collection specified by 'Collection Name'.
- None - Do not apply a collection label.
- Collection Label - Specify the name of the collection label that will be used when 'Collection Label Scheme' specifies that a collection label should be applied to migrated documents.
- Use Cached Item Mappings - Use cached item mappings when migrating to Drive. (Not applicable for Google to Google migrations).
- Preserve Modified Date - Attempt to preserve the modified date during a migration.
- Allow Non-Google Sharing - Allow permissions to be added for users without Google accounts by sending notification emails to those users. Note this can result in many emails being sent to any non-Google addresses.
- Maximum Results Per Request - The limit on the number of results returned when listing files using the Google Drive API.
Team Drive Options
- Team Drive Default Organizers - Optionally, specify a list of existing user email addresses that will be assigned as organizers to Team Drives being migrated to. These organizer accounts will then be used to improve the performance of the migration. In the default case the G Suite admin user account will be used to perform the migration to Team Drives, but specifying multiple users here improves throughput by utlizing multiple organizer accounts simultaneously.
- Team Drive File Permissions - When adding permissions to files within Team Drives choose where these permissions will be applied. Choose from 'File' (the default), 'Root' (where all permissions will be applied on the Team Drive itself and thus inherited down the whole tree) or 'None' (no permissions will be applied)
- Team Drive Folder Permissions - Team Drive folders cannot directly have permissions. Choose whether to apply permissions that apply to folders from the source at the root of the Team Drive, or not at all.
- Team Drive Same Domain Migration Operation - When migrating from a Google Drive folder into a Team Drive choose whether to copy the files, or to move them. Note in the case of a move, the skeleton folder structure of the source folder will remain.
User Options
- Check Users/Resources/Groups Exist - Set this to false if you do not want to check if users, groups or resources exist in Google Apps (useful for testing exporting without creating accounts in Google Apps).
- Create Users/Resources/Groups - If users, groups or resources (supported source systems only) are not present within the Google domain, create them. If users have not been pre-created within the Google system then this can be set to true to have the migration tool create the users. If the users have not been pre-created and this is set to false then the migration process will fail. Note: Setting this to true requires that the Admin SDK is enabled for the Google domain and also that all details are provided for each user, including name, given name, family name and password. Failing to provide any of these details will cause the creation process to fail for that user. It is generally recommended that users are pre-created in the Google domain before processing with the tool. For resources and groups, only the Resource/Group Name (and Import/Export Names) are required.
- Change Password On Login - Force users to change their password on next login.
Contacts Options
- Migrate to 'My Contacts' - Migrate personal contacts to the 'My Contacts' group rather than only to 'All Contacts'.
- Send Individual Contacts - This should generally be left to true, while slower than batch importing its much more reliable.
Label Options
- Explode Message Labels - By default, if an email message is contained within a folder structure the label applied to that message will be the same as the folder structure (e.g. 'Personal Folders/My Folder/My Other Folder'). Setting this option to true will create a label for each of the folders (e.g. for the case described, labels of 'Personal Folders', 'My Folder' and 'My Other Folder' will be applied).
- Create Sub Labels - Create all sub-labels for labels within a message. For example, if a message has the label 'toplevel/midlevel', create both 'toplevel' and 'toplevel/midlevel' labels. This is specifically designed for use with nested labels.
Performance Options
- Multi-Server Drive Migration - Use distributed locking to allow for Drive migrations to be performed from multiple servers. This can be disabled if using only one server for migration.
While the default options are recommended for the majority of users, CloudMigrator gives users the ability to customise their migration experience. The following are the advanced options available to those migrating to GSuite.
OneDrive for Business/SharePoint
These settings are only needed when migrating files or sites to your Office 365 domain.
- Sharepoint Admin URL - The URL for the sharepoint admin center. Go to the office 365 admin portal, then to the Admin Centers and finally to Sharepoint. It should look like this example: https://tenant-admin.sharepoint.com
- Retry Count - The number of times an operation will be tried before failing when making requests to SharePoint.
- Timeout - The timeout for operations with the sharepoint server.
- Maximum File Size - The maximum size (in bytes) of files that will be uploaded.
- Top Level Folder - Optionally place all folders and files in the specified top level folder. Leave empty to not create an extra top level folder.
- Truncate Folders and Files - OneDrive and SharePoint impose various restrictions on the length of folder and filenames. By default CloudMigrator365 will truncate these folder and filenames so that they fit under the limits imposed by SharePoint. If this is disabled and any folder or file paths are too long, then these folders and files will fail to migrate.
- Preserve File Created and Modified Dates - Preserve date and time created metadata for any files migrated.
- Provision Sites - Provision any personal OneDrive sites or Team Sites that do not already exist as part of a migration.
- Provision Sites Timeout Check - Wait at most this number of milliseconds when provisioning sites before failing if the site has not yet been created.
- Team Site URL - The URL for sites and teams. This is usually https://tenant.sharepoint.com
- Team/Sites Directory - When migrating to Team Sites, choose to migrate to a URL starting with 'teams' or 'sites'.
- Trace OneDrive Requests - All OneDrive requests will be logged in the trace files in order to help diagnose errors.
- Ignore List Sync Limits - Ignore restrictions and limitations in using OneDrive for Business to sync SharePoint Online or SharePoint 2013 libraries to your computer. There are very few scenarios in which this options should be changed.
PowerShell
It is highly recommended to use the default PowerShell settings, unless you know exactly what you are doing.
- PowerShell Variables - Specify the name/value pairs that can be used as replacement variables in PowerShell scripts that the tool may run. The name must be in the format: [!name], where 'name' can be anything of your choice.
- Run PowerShell Init Script - Choose if the PowerShell initialization script will be run. The PowerShell initialization script is run once at the beginning of a migration.
- PowerShell Init Script - The script that will be run if permitted by the previous setting.
- Run PowerShell Before Script - Choose if a PowerShell script will be run at the beginning of a user's migration. This PowerShell script is run for every user at the beginning of their migration.
- PowerShell Before Script - The script that will be run if permitted by the previous setting.
- Run PowerShell After Script - Choose if a PowerShell script will be run after a user's migration. This PowerShell script is run after a user's migration has finished.
- PowerShell After Script - The script that will be run if permitted by the previous setting.
- Run PowerShell Finalize Script - Choose if a PowerShell script will be run after all users migrations are complete. This PowerShell script is run once, when all migrations are complete.
- PowerShell Finalize Script - The script that will be run if permitted by the previous setting.
Account Details
- Autodiscovery Service URL - In order to connect to the correct server that a user’s data may be stored on, autodiscovery is used to obtain the server information. Input the URL to the autodiscovery service for your domain. The default value is a general address than can usually be used to resolve server addresses on Office 365.
- Direct Exchange EWS URL - For Office 365 you should use autodiscovery and not specify anything for this setting.
- Authentication Method - Choose the authentication type that will be used with the server. For Office 365 this will normally be set to 'Basic'.
- Use Workstation Credentials - Use the credentials of the logged in user rather than the provided credentials. Use this for NTLM, Kerberos or other authentication methods which require the Windows identity. This setting generally is irrelevant when migrating to/from Office 365.
- Credential Method - If you have setup Application Impersonation as described earlier in this page then you should specify Impersonation for this setting. If you have not setup Application Impersonation (or cannot use it for some reason), then choose either Delegated Access (for BPOS for example) or User Credentials. If using User Credentials then the user’s passwords on the Users tab must be correct.
Transfer Settings
- Retry Count - The number of times an operation will be attempted before failing.
- Timeout - The maximum time, in milliseconds that communication will be attempted.
- Use X-AnchorMailbox Header - When using application impersonation, use the X-AnchorMailbox header to improve performance.
Calendar Timezone
- Exchange 2010/Office 365 Calendar Timezone - The default timezone to use with appointments when migrating from Exchange 2010 when the timezone is not identified by other means.
Public Folder Options
- Nest Public Folders - Nest Public Folders under a specific top-level Public Folder.
- Nested Public Folder Name - The name of the top-level Public Folder under which other Public Folders will be nested if 'Nest Public Folders' is true.
Message Options
- Maximum File Size - The maximum message size, in bytes, that will be migrated, anything larger will be ignored.
- Strip Received Headers - Removes Received headers from emails and replaces them with a single header corresponding to the Date header of the email. See incorrect date ordering of emails in Exchange after migrating from G Suite for more information.
- Use Chunked HTTP Web Requests - This is an optimisation for CloudMigrator that allows large files to be migrated without reading the entire payload into memory. This is enforced for Office 365 regardless of setting, but disabled by default for other Exchange platforms as they may not support chunked/streamed uploads.